• Follow
  • Follow
  • Follow


SYSTEM STATUS



1300 093 786

Domain Central Logo
  • Domain Names
    • Domain Registration
    • Domain Transfers
    • .au Direct
  • Web Hosting
    • WordPress Hosting
    • Plesk Hosting with SiteJet
    • Community Hosting
    • SSL Certificates
  • Email Solutions
    • Titan Mail
    • Microsoft 365
    • Office 365
  • Website Services
    • WordPress Maintenance and Support
    • Website Design
    • Ecommerce Shop Web Design
help Centre

Email

36
  • How to Archive IMAP Email Locally in Microsoft Outlook
  • How to Find and Provide Email Headers
  • Outlook Archiving Didn’t Reduce Email Storage (IMAP Accounts)
  • What is a DMARC Record and how do I create one: A Plain English Guide
  • Outlook
    • How to Archive IMAP Email Locally in Microsoft Outlook
    • How to Switch from the New Outlook to Classic Outlook on Windows
  • Microsoft 365
    • How to add a domain in Microsoft 365
    • How to add a user in Microsoft 365
    • How to configure email forwarders in Microsoft 365
    • How to change user permissions in Microsoft 365
    • Configuring 2FA in Microsoft 365
    • How to assign a license to a user in Microsoft 365
    • How to add/remove aliases in Microsoft 365
    • How to Create a User with Global Administrator Permissions in Microsoft 365
    • How to configure your Microsoft365 email account in Outlook
  • Smartermail
    • How to set up content filter rules for email accounts in SmarterMail
    • How to manage aliases in SmarterMail
    • How to configure Smartermail Email account on iPhone
    • How to change Mailbox Quota for SmarterMail account
    • What do I do when my SmarterMail Mailbox is Full?
    • How to purchase additional resources for your SmarterMail account
    • How to configure Smartermail Email account in Outlook & Mac Mail
    • Managing email accounts in SmarterMail
    • Password Changing in SmarterMail
    • How to configure Smartermail Email account on an Android device
    • How to enable Active Sync for your email in SmarterMail
    • Adding an image to your email signature in SmarterMail
    • How do I access the Smartermail Webmail Portal
  • Titan Mail
    • How to Log In to the Client Area and Set Up Your Titan Email Account
    • Download the Titan Mobile App
    • Setting up Titan on your iOS device
    • Setting up Titan on your Android device
    • Use Titan’s web version like a desktop app
    • How to setup an Email Alias in Titan
    • Creating and managing email signatures in Titan Mail
    • Configure Titan Mail in Microsoft Outlook

Domains

12
  • How to update WhoIs Information for a domain
  • How to setup an Email Domain Forwarder
  • How to setup a Domain Forwarder
  • How to Enable DNSSEC for Your Domain
  • .id.au Eligibility and Allocation
  • .asn.au Eligibility and Allocation
  • Eligibility & Allocation
    • .id.au Eligibility and Allocation
    • .asn.au Eligibility and Allocation
    • net.au Eligibility and Allocation
    • .org.au Eligibility and Allocation
    • .com.au Eligibility and Allocation
    • .au Direct Eligibility and Allocation

Error Codes

1
  • Outlook Error 0x800ccc0d or 0x800ccc0f

Getting Started

4
  • How to Log in to Plesk
  • Creating and Managing Support Tickets in the Client Area
  • How to login to the Client Area
  • Client Area vs. Control Panel; where do I go?

Web Hosting

44
  • Managing Your Website (Sites) in AdminBolt
  • How to Install WordPress in AdminBolt
  • How to Redirect a Page or Website Using .htaccess
  • How to Temporarily Point a Website to a Different IP Address Using the macOS Hosts File
  • How to Temporarily Point a Website to a Different IP Address Using the Windows Hosts File
  • How to purchase additional hosting resources
  • How to Create a DMARC Record in cPanel
  • Plesk
    • How to Remove a Subdomain in Plesk
    • How to Add a Subdomain in Plesk
    • How to Remove a Domain in Plesk
    • How to Add a New Domain in Plesk
    • How to Create a Database in Plesk
    • How to Check Disk and Bandwidth Usage in Plesk
    • How to Create a Directory or Files in Plesk File Manager
    • How to Upload Files via the Plesk File Manager
    • How to Change the Plesk Account’s Contact Details
    • How to Update a Plesk Account’s Email Address
    • How to Reset a Plesk Account Password
    • How to Change the Password of a Plesk Account
    • How to Log in to Plesk
    • How to Encrypt Database Password in Plesk Backup
    • How to Configure an FTP Backup in Plesk
    • How to Exclude Specific Files/Folders from the Plesk Backup
    • How to Generate a Full Backup in Plesk
    • How to Log In to Plesk and Enable AutoSSL
    • Using WP Toolkit in Plesk
  • WP Squared
    • Configure CDN on WP Squared
    • Add or Remove a Forwarding domain in WP Squared
    • How do I create a backup in WP Squared?
    • Using File Manager in WP Squared
    • Manage Files and Folders in WP Squared
    • Managing your website in WP Squared
    • How to Enable Two-Factor Authentication (2FA) in WP Squared
    • How to Disable or Reset Two-Factor Authentication (2FA) in WP Squared
    • How to Create a Staging Website Copy in WP Squared
    • How to Clear the NGINX Cache in WP Squared
    • How do I create my website in WP Squared?
    • How do I change/reset my WP Squared Hosting Password?
  • cPanel
    • How to Redirect a Page or Website Using .htaccess
    • How to Remove a CSR code in cPanel
    • How to Generate a Certificate Signing Request (CSR) in cPanel
    • How to Retrieve a CSR from cPanel
  • Admin Bolt
    • Managing Your Website (Sites) in AdminBolt
    • How to Install WordPress in AdminBolt

WordPress

22
  • How to Install WordPress in AdminBolt
  • Using WP Toolkit in Plesk
  • How to Change the WordPress User’s Display Name
  • How to Change the Password of a WordPress Account
  • How to Forcefully Update or Reinstall a WordPress Plugin
  • How to Delete Categories in WordPress
  • How to Delete an Uncategorised Category in WordPress
  • How to Add a New Category in WordPress
  • How to Bulk Delete Posts in WordPress
  • How to Remove a Post in WordPress
  • Simplifying Your Website’s Speed: A Step-by-Step Guide to Installing LiteSpeed Cache Plugin
  • Is LiteSpeed Cache Already Installed on Your WordPress Site? Here’s How to Check
  • How to Remove Sample Comments and Posts From WordPress
  • How to Deactivate and Delete a WordPress Plugin
  • How to Manually Install a WordPress Plugin
  • How to Delete a WordPress Theme
  • How to Manually Install a WordPress Theme
  • Litespeed WordPress Cache Plugin Configuration
  • How to Install a New WordPress Theme
  • How to Install a WordPress Plugin
  • How to Write and Publish Your First Blog Post in WordPress
  • How to Access the WordPress Admin Dashboard

DNS & Nameservers

1
  • How to add an SPF record for your domain from the client area

Transferring to Us

1
  • How to transfer your domain to Domain Central

Troubleshooting

7
  • How to perform a Traceroute
  • How to take a Screenshot for Support
  • How to Run a Traceroute to a Website from Your Computer
  • How to Let Our Support Team Access Your Windows 10 or 11 Computer Using Quick Assist
  • How to Clear the Browser Cache on Edge, Chrome, Safari, and Firefox
  • Is my website or the server down?
  • Outlook Archiving Didn’t Reduce Email Storage (IMAP Accounts)

Security

6
  • Has Your Email Address Been Pwned?
  • SSL Certificates
    • How to Log In to Plesk and Enable AutoSSL
    • How to Remove a CSR code in cPanel
    • How to Retrieve a CSR from cPanel
    • How to Generate a Certificate Signing Request (CSR) in cPanel
    • Do I need an SSL Certificate?
  • Home
  • Help
  • Email
  • Titan Mail
  • How to Log In to the Client Area and Set Up Your Titan Email Account
View Categories

How to Log In to the Client Area and Set Up Your Titan Email Account

7 min read

This guide shows you how to access your Titan Email from your Domain Central Client Area, create mailboxes, reset passwords, set up forwarding and aliases, and launch Titan Webmail.


Before You Begin #

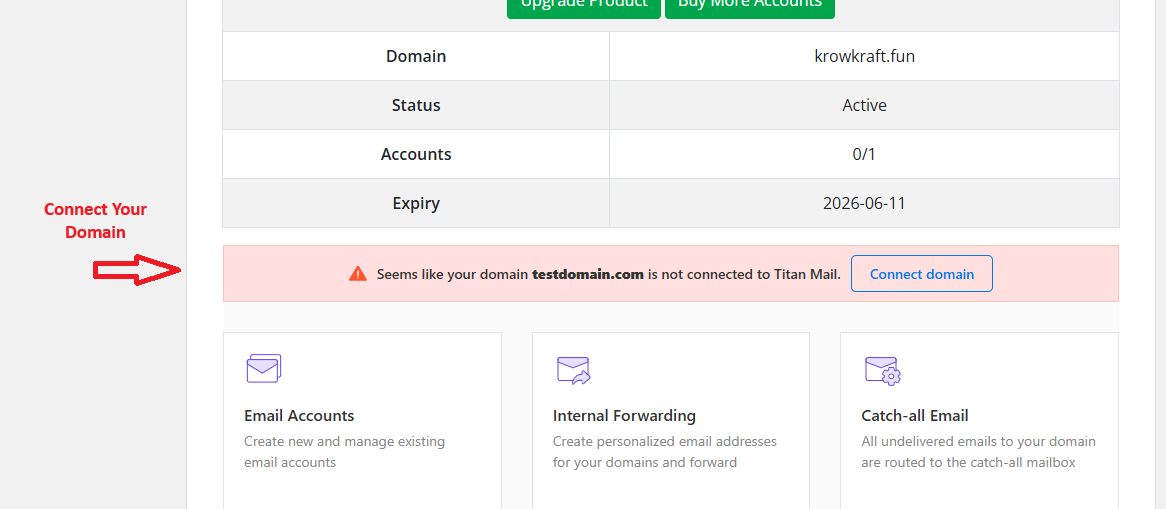
There are two components to setting up your new email account; Updating your domain name DNS settings with new MX records and creating your first mailbox.

If you domain name is with Domain Central; both steps are done within your Domain Central client area.

If your domain name is registered with another provider, you will need to get your new MX records from within your Domain Central client area, then go to your domain provider to update your DNS accordingly, then come back to your Domain Central client area to continue with mailbox creation.

Please see THIS article first on Setting up your DNS records. Then come back to this article when you are ready to create your first mailbox.

  • Have your Client Area login email and password handy. If you’ve forgotten your password, click Forgot Password? on the login page to reset it.
  • Ensure your domain’s DNS is pointing to the correct Titan records (MX, SPF, DKIM). If your service is brand new, DNS changes can take up to 4–24 hours to propagate.

Step 1 — Log In to the Client Area #

  1. Go to our Client Area login page.
  2. Enter your email address and password, then click Login.

Step 2 — Open Your Titan Email Service #

  1. From the top menu, click Services > My Services or scroll down the Portal Home page till you see your Titan Email Product listed
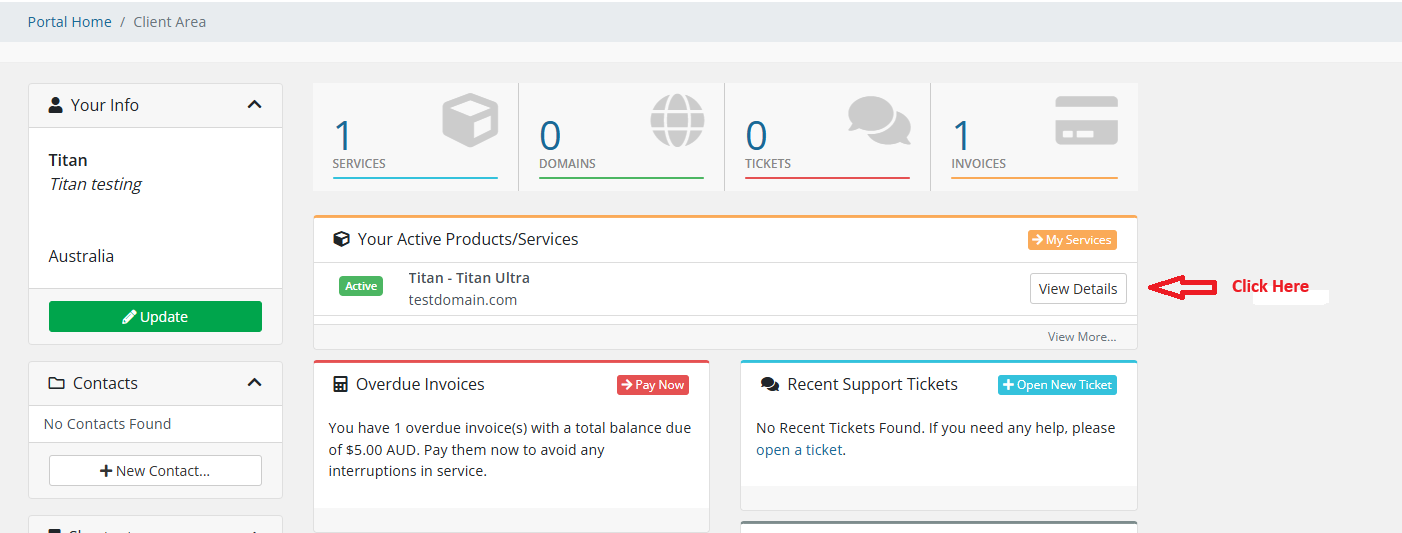
  2. Find your Titan Email product in the list and click View Details.
  3. On the Product Details page, scroll until you see the Titan Email Accounts section.

    NOTE: You may need to give it a few moments once you start scrolling down for all the options to appear!
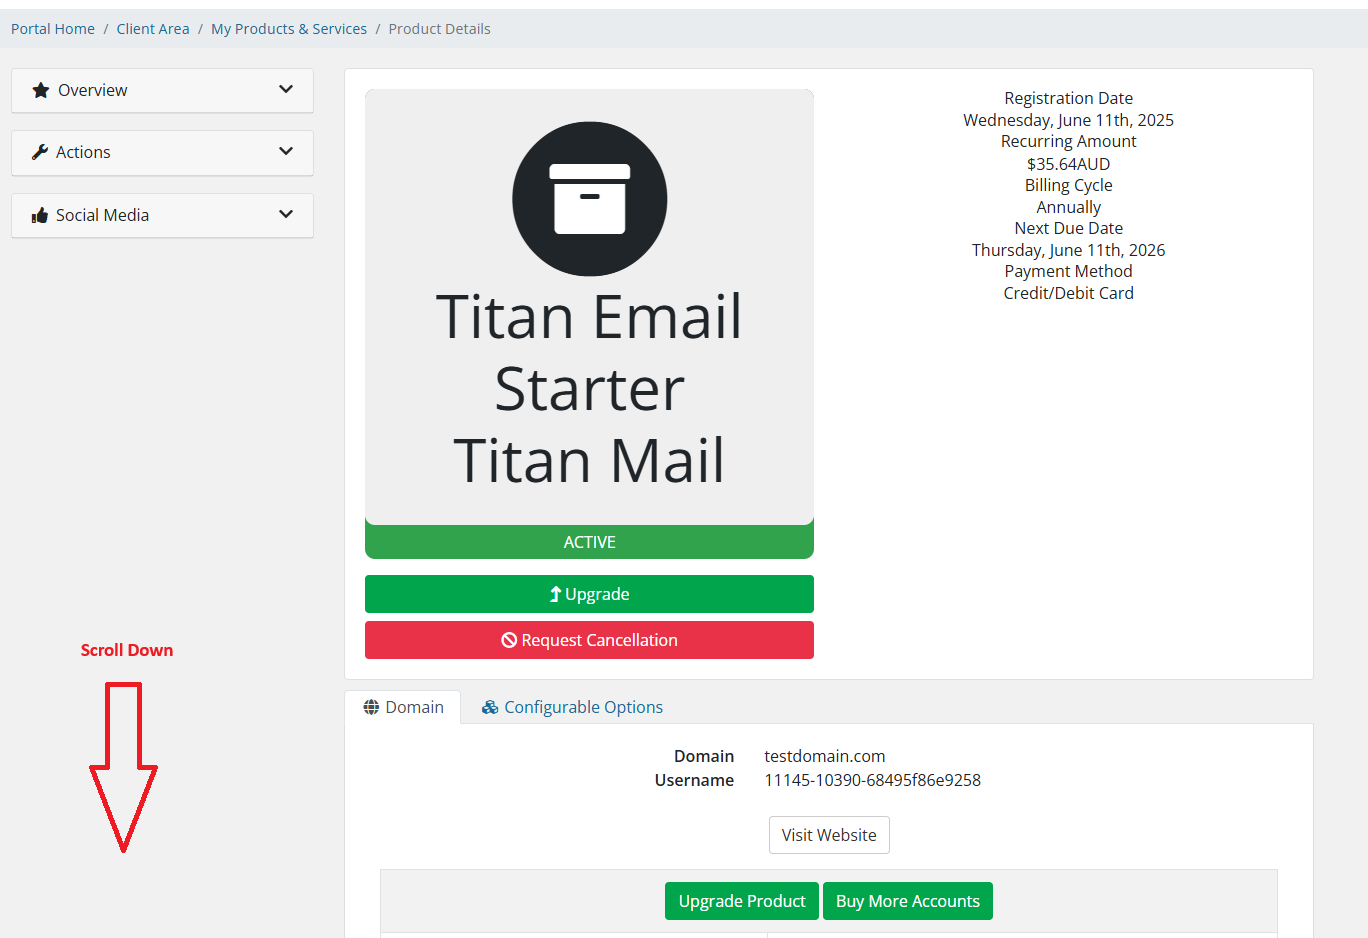
Tip: If you don’t see the Titan Email section, your order may still be provisioning or the service is suspended/expired. Check the service Status near the top of the page, or contact Support.

Step 3 — Create Your First Mailbox #

  1. In Titan Email Accounts, click Add Mailbox (or Create).
  2. Enter:
    • Mailbox Name (e.g., info, yourname)
    • Display Name (the name recipients will see)
    • Password (create a strong password) or choose Auto-generate
  3. Click Save / Create. The mailbox will appear in your mailbox list.
Note: If you’ve reached your mailbox limit, you’ll need to remove an existing mailbox or upgrade your plan to add more.

Step 4 — Log In to Titan Webmail #

  1. In the mailbox list, next to the mailbox you want, click Webmail or Login to Webmail.
  2. Alternatively, open Titan Webmail directly and sign in with your full email address and password.
Quick Access: Bookmark the Titan Webmail login page in your browser for faster access.

Step 5 — Download the Titan App #

Why Use the Titan Mail App Instead of 3rd-Party Apps?

While Titan Email can be added to Outlook, Apple Mail, Gmail, and other 3rd-party apps, we strongly recommend using the official Titan Mail App for the best experience. Here’s why:

  • Seamless Integration: The Titan app is built specifically for Titan Email, so all features (aliases, signatures, out-of-office, etc.) work perfectly without manual setup.
  • Push Notifications: Receive instant alerts on new emails, unlike some 3rd-party apps where mail sync can be delayed.
  • Advanced Features: Access built-in productivity tools such as email templates, read receipts, follow-up reminders, and priority inbox.
  • Simpler Setup: No need to enter IMAP/SMTP server details or ports—just log in with your Titan Email credentials.
  • Consistent Updates: Titan’s own app is regularly updated for security and new features, ensuring compatibility and reliability.
Recommendation: Use the Titan Mail app on all your devices for the fastest setup and the smoothest experience.

How to Install and Use the Titan Mail App #

  1. Download the App:
    In The Titan Webmail client click on the link to download your APP as this will auto config and install your app for you.
  2. Alternatively you can download from your phones App store:
  1. Download Titan Mail for Android
  2. Download Titan Mail for iOS
  3. Open the App once installed.
  4. Enter your Titan Email address (e.g. yourname@yourdomain.com) and password.
  5. Tap Sign In. The app will automatically configure your account—no manual server settings required.
  6. Enable Notifications when prompted so you receive new email alerts instantly.

Extra Features in the Titan App #

  • Read Receipts: See when recipients open your email.
  • Follow-Up Reminders: Get a nudge if someone hasn’t replied within a set time.
  • Priority Inbox: Automatically sorts important messages to the top.
  • Signature Management: Easily create and switch between multiple signatures.
  • Web + Mobile Sync: Everything you do in the app is synced instantly with Titan Webmail.
Tip: You can install the Titan Mail app on multiple devices and stay logged in everywhere, so your email is always in sync.

Step 6 (optional) — Set Up on Phone or Desktop (IMAP/SMTP) #

You can connect Titan Email to Outlook, Apple Mail, Thunderbird, iOS Mail, and Android mail apps but you need to fist click on the Link to Enable 3rd Party Apps

NOTE: we recommend using the Titan Mail app to get full access to all of the features.

  1. In Titan Email Accounts, click the mailbox’s Settings or Configure option.
  2. Find the Client Setup or IMAP/SMTP settings. Typical values are:
    • Incoming (IMAP): imap0101.titan.email, Port 993, SSL/TLS
    • Outgoing (SMTP): smtp0101.titan.email, Port 465, SSL/TLS
    • Username: your full email address
    • Password: your mailbox password
  3. Enter these in your mail app when adding the account.
Heads-up: Some apps label SSL/TLS as “Use secure connection” or “Encryption method: SSL”. Always choose the secure option for both IMAP and SMTP.

Other Functions in the Titan Email Accounts Section #

Reset Mailbox Password #

  1. Find the mailbox in the list and click Reset Password (or Edit > Change Password).
  2. Enter a new strong password or auto-generate one, then click Save.

Create Aliases #

Aliases are extra email addresses that deliver to an existing mailbox (e.g., sales@ → jane@).

  1. Open the mailbox’s Aliases or Manage Aliases.
  2. Click Add Alias, enter the alias (left-hand part before @), and save.

Set Forwarding #

Forward incoming mail to another address (internal or external).

  1. Open Forwarding for the mailbox.
  2. Enter the destination email address and save.
  3. (Optional) Choose whether to keep a copy in the Titan inbox.

Autoresponder (Out-of-Office) #

  1. Go to Autoresponder / Vacation Reply for the mailbox.
  2. Enable it, set the subject/message, and choose start/end dates.
  3. Click Save.

Mailbox Management (Rename / Delete) #

  • Rename: Use Edit to change display name. (Changing the actual email address may require creating a new mailbox and/or alias.)
  • Delete: Use Delete to remove a mailbox. Warning: this permanently removes its mail unless exported first.

Launch Titan Webmail & Admin #

  • Webmail: One-click Login to Webmail from the mailbox row.
  • Titan Admin: Some plans provide links to manage users, signatures, templates and more in the Titan admin interface.

DNS & Deliverability (Recommended) #

For best results, add or verify these DNS records at your domain’s DNS host:

  • MX records for Titan (routes inbound email)
  • SPF (permits Titan to send on your behalf)
  • DKIM (cryptographic signing for better trust)
  • DMARC (policy and reporting for spoof protection)

In many cases, the Titan Email Accounts section shows a Status or DNS tab indicating what’s missing and providing exact values to add. After updating DNS, allow time for propagation.


Troubleshooting #

  • Can’t see Titan Email Accounts: Check the service status on the Product Details page (Active vs Pending/Suspended). If pending, provisioning may still be in progress.
  • Login to Webmail fails: Reset the mailbox password in the Client Area and try again.
  • Mail not arriving: Verify MX records point to Titan and remove any old/conflicting MX entries.
  • Sent mail going to spam: Ensure SPF/DKIM/DMARC are correctly set and wait for DNS to propagate.
  • App setup errors: Double-check IMAP/SMTP server names, ports (993/465), SSL/TLS enabled, and use the full email as the username.

Need Help? #

If you get stuck, open a Support Ticket from the Client Area with your domain name, the mailbox email address, and any error messages/screenshots. We’ll help you get up and running.

Did you like this article ?

Share This Article :

  • Facebook
  • X
  • LinkedIn
Updated on September 8, 2026
Configure Titan Mail in Microsoft OutlookDownload the Titan Mobile App
Table of Contents
  • Before You Begin
  • Step 1 — Log In to the Client Area
  • Step 2 — Open Your Titan Email Service
  • Step 3 — Create Your First Mailbox
  • Step 4 — Log In to Titan Webmail
  • Step 5 — Download the Titan App
  • How to Install and Use the Titan Mail App
    • Extra Features in the Titan App
  • Step 6 (optional) — Set Up on Phone or Desktop (IMAP/SMTP)
  • Other Functions in the Titan Email Accounts Section
    • Reset Mailbox Password
    • Create Aliases
    • Set Forwarding
    • Autoresponder (Out-of-Office)
    • Mailbox Management (Rename / Delete)
    • Launch Titan Webmail & Admin
  • DNS & Deliverability (Recommended)
  • Troubleshooting
  • Need Help?
dc-logo

Subscribe to our Newsletter

Services

Web Hosting

Domain Registration

Email Solutions

Domain Transfer

Website Services

Company

About Us

Blog

Contact Us

Legal

Accessibility Statement

customer service



Help Centre



Existing Client Login



Sales Enquiries



System Status

customer service



Help Centre



Existing Client Login



Sales Enquiries



System Status

Services

Web Hosting

Domain Registration

Email Solutions

Domain Transfer

Website Services

Company

About Us

Blog

Contact Us

Legal

Accessibility Statement

© Copyright Domain Central ANZ 2025

Privacy Policy • Terms of Service 

  • Follow
  • Follow
  • Follow
Manage Consent
To provide the best experiences, we use technologies like cookies to store and/or access device information. Consenting to these technologies will allow us to process data such as browsing behaviour or unique IDs on this site. Not consenting or withdrawing consent, may adversely affect certain features and functions.
Functional Always active
The technical storage or access is strictly necessary for the legitimate purpose of enabling the use of a specific service explicitly requested by the subscriber or user, or for the sole purpose of carrying out the transmission of a communication over an electronic communications network.
Preferences
The technical storage or access is necessary for the legitimate purpose of storing preferences that are not requested by the subscriber or user.
Statistics
The technical storage or access that is used exclusively for statistical purposes. The technical storage or access that is used exclusively for anonymous statistical purposes. Without a subpoena, voluntary compliance on the part of your Internet Service Provider, or additional records from a third party, information stored or retrieved for this purpose alone cannot usually be used to identify you.
Marketing
The technical storage or access is required to create user profiles to send advertising, or to track the user on a website or across several websites for similar marketing purposes.
  • Manage options
  • Manage services
  • Manage {vendor_count} vendors
  • Read more about these purposes
View preferences
  • {title}
  • {title}
  • {title}