• Follow
  • Follow
  • Follow


SYSTEM STATUS



1300 093 786

Domain Central Logo
  • Domain Names
    • Domain Registration
    • Domain Transfers
    • .au Direct
  • Web Hosting
    • WordPress Hosting
    • Plesk Hosting with SiteJet
    • Community Hosting
    • SSL Certificates
  • Email Solutions
    • Titan Mail
    • Microsoft 365
    • Office 365
  • Website Services
    • WordPress Maintenance and Support
    • Website Design
    • Ecommerce Shop Web Design
help Centre

Email

36
  • How to Archive IMAP Email Locally in Microsoft Outlook
  • How to Find and Provide Email Headers
  • Outlook Archiving Didn’t Reduce Email Storage (IMAP Accounts)
  • What is a DMARC Record and how do I create one: A Plain English Guide
  • Outlook
    • How to Archive IMAP Email Locally in Microsoft Outlook
    • How to Switch from the New Outlook to Classic Outlook on Windows
  • Microsoft 365
    • How to add a domain in Microsoft 365
    • How to add a user in Microsoft 365
    • How to configure email forwarders in Microsoft 365
    • How to change user permissions in Microsoft 365
    • Configuring 2FA in Microsoft 365
    • How to assign a license to a user in Microsoft 365
    • How to add/remove aliases in Microsoft 365
    • How to Create a User with Global Administrator Permissions in Microsoft 365
    • How to configure your Microsoft365 email account in Outlook
  • Smartermail
    • How to set up content filter rules for email accounts in SmarterMail
    • How to manage aliases in SmarterMail
    • How to configure Smartermail Email account on iPhone
    • How to change Mailbox Quota for SmarterMail account
    • What do I do when my SmarterMail Mailbox is Full?
    • How to purchase additional resources for your SmarterMail account
    • How to configure Smartermail Email account in Outlook & Mac Mail
    • Managing email accounts in SmarterMail
    • Password Changing in SmarterMail
    • How to configure Smartermail Email account on an Android device
    • How to enable Active Sync for your email in SmarterMail
    • Adding an image to your email signature in SmarterMail
    • How do I access the Smartermail Webmail Portal
  • Titan Mail
    • How to Log In to the Client Area and Set Up Your Titan Email Account
    • Download the Titan Mobile App
    • Setting up Titan on your iOS device
    • Setting up Titan on your Android device
    • Use Titan’s web version like a desktop app
    • How to setup an Email Alias in Titan
    • Creating and managing email signatures in Titan Mail
    • Configure Titan Mail in Microsoft Outlook

Domains

12
  • How to update WhoIs Information for a domain
  • How to setup an Email Domain Forwarder
  • How to setup a Domain Forwarder
  • How to Enable DNSSEC for Your Domain
  • .id.au Eligibility and Allocation
  • .asn.au Eligibility and Allocation
  • Eligibility & Allocation
    • .id.au Eligibility and Allocation
    • .asn.au Eligibility and Allocation
    • net.au Eligibility and Allocation
    • .org.au Eligibility and Allocation
    • .com.au Eligibility and Allocation
    • .au Direct Eligibility and Allocation

Error Codes

1
  • Outlook Error 0x800ccc0d or 0x800ccc0f

Getting Started

4
  • How to Log in to Plesk
  • Creating and Managing Support Tickets in the Client Area
  • How to login to the Client Area
  • Client Area vs. Control Panel; where do I go?

Web Hosting

44
  • Managing Your Website (Sites) in AdminBolt
  • How to Install WordPress in AdminBolt
  • How to Redirect a Page or Website Using .htaccess
  • How to Temporarily Point a Website to a Different IP Address Using the macOS Hosts File
  • How to Temporarily Point a Website to a Different IP Address Using the Windows Hosts File
  • How to purchase additional hosting resources
  • How to Create a DMARC Record in cPanel
  • Plesk
    • How to Remove a Subdomain in Plesk
    • How to Add a Subdomain in Plesk
    • How to Remove a Domain in Plesk
    • How to Add a New Domain in Plesk
    • How to Create a Database in Plesk
    • How to Check Disk and Bandwidth Usage in Plesk
    • How to Create a Directory or Files in Plesk File Manager
    • How to Upload Files via the Plesk File Manager
    • How to Change the Plesk Account’s Contact Details
    • How to Update a Plesk Account’s Email Address
    • How to Reset a Plesk Account Password
    • How to Change the Password of a Plesk Account
    • How to Log in to Plesk
    • How to Encrypt Database Password in Plesk Backup
    • How to Configure an FTP Backup in Plesk
    • How to Exclude Specific Files/Folders from the Plesk Backup
    • How to Generate a Full Backup in Plesk
    • How to Log In to Plesk and Enable AutoSSL
    • Using WP Toolkit in Plesk
  • WP Squared
    • Configure CDN on WP Squared
    • Add or Remove a Forwarding domain in WP Squared
    • How do I create a backup in WP Squared?
    • Using File Manager in WP Squared
    • Manage Files and Folders in WP Squared
    • Managing your website in WP Squared
    • How to Enable Two-Factor Authentication (2FA) in WP Squared
    • How to Disable or Reset Two-Factor Authentication (2FA) in WP Squared
    • How to Create a Staging Website Copy in WP Squared
    • How to Clear the NGINX Cache in WP Squared
    • How do I create my website in WP Squared?
    • How do I change/reset my WP Squared Hosting Password?
  • cPanel
    • How to Redirect a Page or Website Using .htaccess
    • How to Remove a CSR code in cPanel
    • How to Generate a Certificate Signing Request (CSR) in cPanel
    • How to Retrieve a CSR from cPanel
  • Admin Bolt
    • Managing Your Website (Sites) in AdminBolt
    • How to Install WordPress in AdminBolt

WordPress

22
  • How to Install WordPress in AdminBolt
  • Using WP Toolkit in Plesk
  • How to Change the WordPress User’s Display Name
  • How to Change the Password of a WordPress Account
  • How to Forcefully Update or Reinstall a WordPress Plugin
  • How to Delete Categories in WordPress
  • How to Delete an Uncategorised Category in WordPress
  • How to Add a New Category in WordPress
  • How to Bulk Delete Posts in WordPress
  • How to Remove a Post in WordPress
  • Simplifying Your Website’s Speed: A Step-by-Step Guide to Installing LiteSpeed Cache Plugin
  • Is LiteSpeed Cache Already Installed on Your WordPress Site? Here’s How to Check
  • How to Remove Sample Comments and Posts From WordPress
  • How to Deactivate and Delete a WordPress Plugin
  • How to Manually Install a WordPress Plugin
  • How to Delete a WordPress Theme
  • How to Manually Install a WordPress Theme
  • Litespeed WordPress Cache Plugin Configuration
  • How to Install a New WordPress Theme
  • How to Install a WordPress Plugin
  • How to Write and Publish Your First Blog Post in WordPress
  • How to Access the WordPress Admin Dashboard

DNS & Nameservers

1
  • How to add an SPF record for your domain from the client area

Transferring to Us

1
  • How to transfer your domain to Domain Central

Troubleshooting

7
  • How to perform a Traceroute
  • How to take a Screenshot for Support
  • How to Run a Traceroute to a Website from Your Computer
  • How to Let Our Support Team Access Your Windows 10 or 11 Computer Using Quick Assist
  • How to Clear the Browser Cache on Edge, Chrome, Safari, and Firefox
  • Is my website or the server down?
  • Outlook Archiving Didn’t Reduce Email Storage (IMAP Accounts)

Security

6
  • Has Your Email Address Been Pwned?
  • SSL Certificates
    • How to Log In to Plesk and Enable AutoSSL
    • How to Remove a CSR code in cPanel
    • How to Retrieve a CSR from cPanel
    • How to Generate a Certificate Signing Request (CSR) in cPanel
    • Do I need an SSL Certificate?
  • Home
  • Help
  • Email
  • Titan Mail
  • Creating and managing email signatures in Titan Mail
View Categories

Creating and managing email signatures in Titan Mail

2 min read

Your email signature is your digital calling card, representing your professional identity. Make sure it stands out and includes your contact information and work details at the end of an email.

  • Accessing email signatures
  • Setting up email signatures
  • Managing email signatures
  • Using your email signature
  • Creating and managing email signatures on mobile

Accessing the email signatures section #

You can access the email signatures section in either of the 2 ways:

1. From the App Switcher #

  • Click on the Switch Apps button (top left), also known as the App Switcher.
  • Scroll down in the App Switcher — the first option is Signature Designer. Click on it.
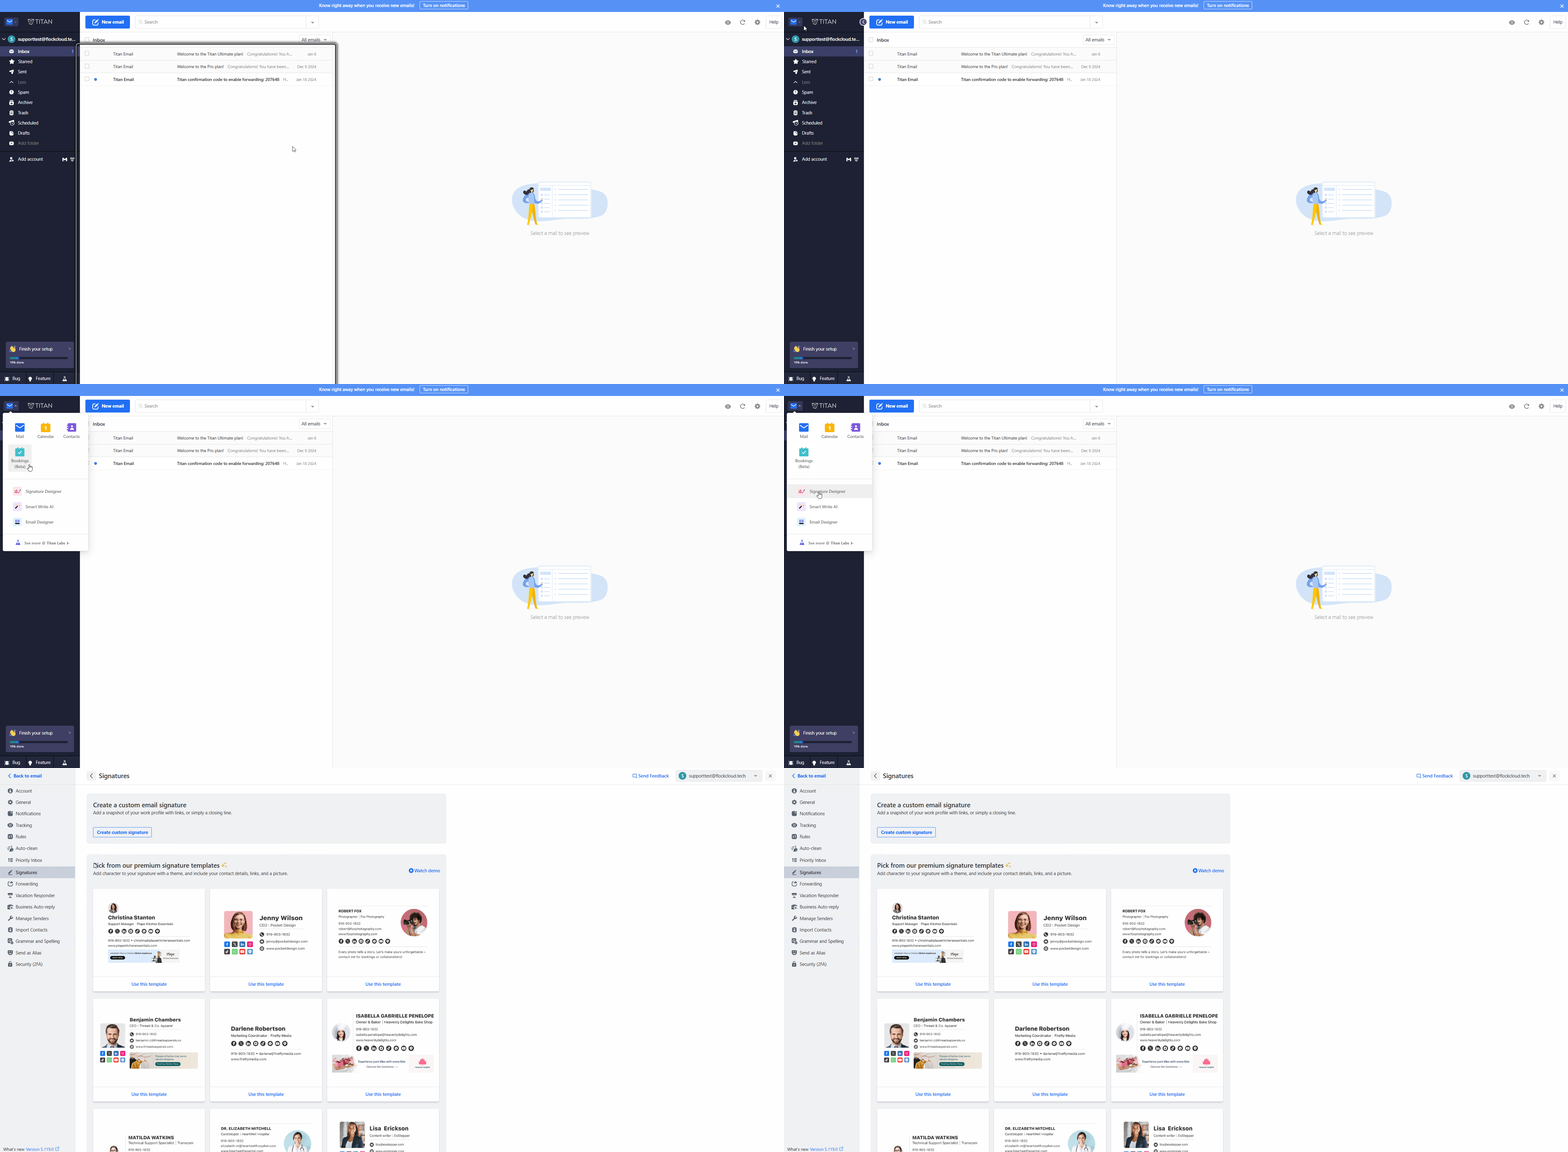
Access Signature Designer via App Switcher

2. From the Preferences section #

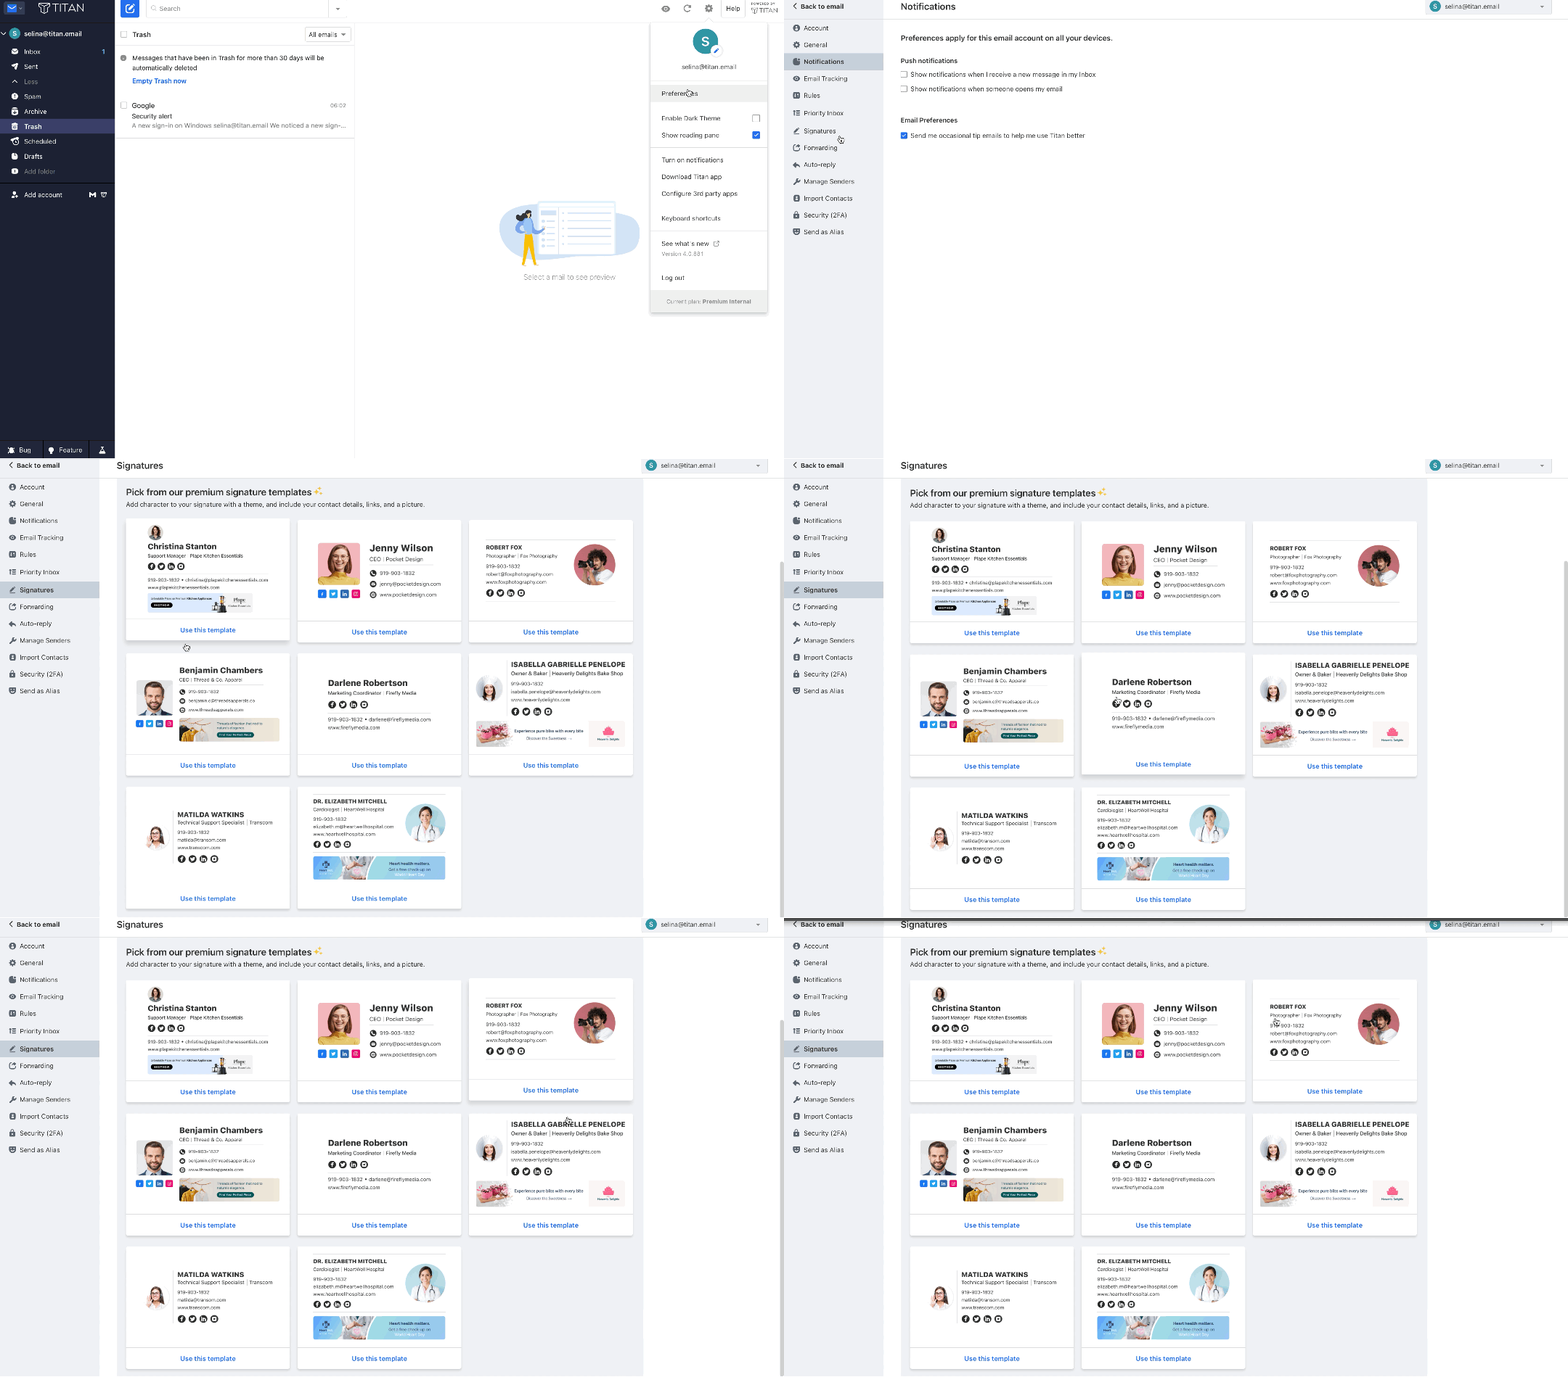
  • Click Settings (gear icon) in the top-right corner of Titan Webmail and select Preferences.
  • Go to Signatures on the left sidebar.

Signature templates selection

Setting up email signatures #

You can set up a signature in the following 2 ways:

1. Using Titan’s professional templates #

Please note: This feature is available on Titan’s select plans. If it isn’t included in your current plan, you can upgrade your email plan by clicking the yellow upgrade button in the top-right of Titan Webmail.

Choose from curated, customizable professional templates to get you started:

  • Pick from the pre-loaded signature templates.
Signature templates selection

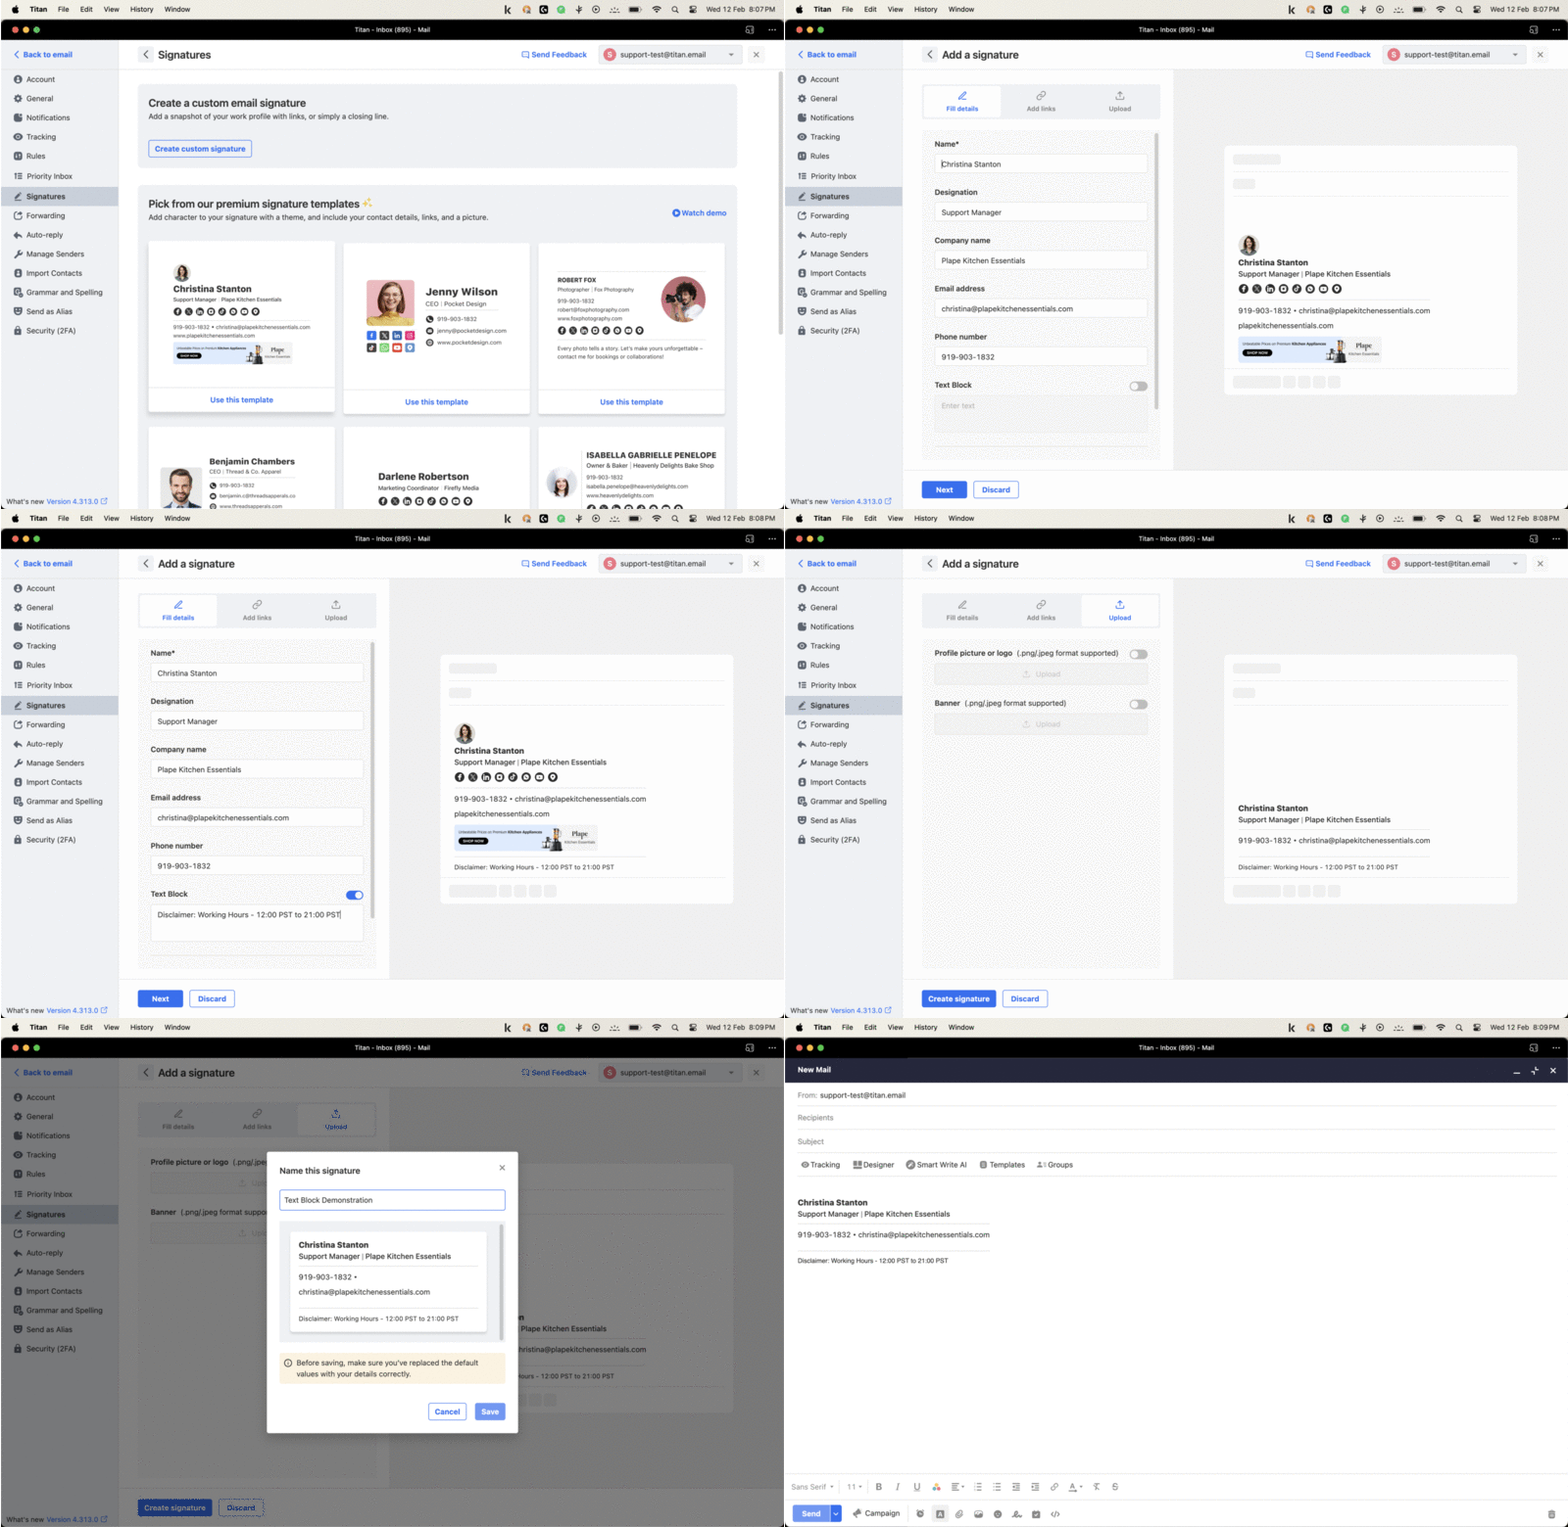
  • Enter your details in the Fill Details tab (Note: your name is mandatory; the rest is optional), then click Next.
Fill details step

  • Add links such as social media (Facebook, X/Twitter, LinkedIn, Instagram) and your website URL in the Add Links tab, then click Next.
    Note: You can toggle the slider to hide or show a particular link.
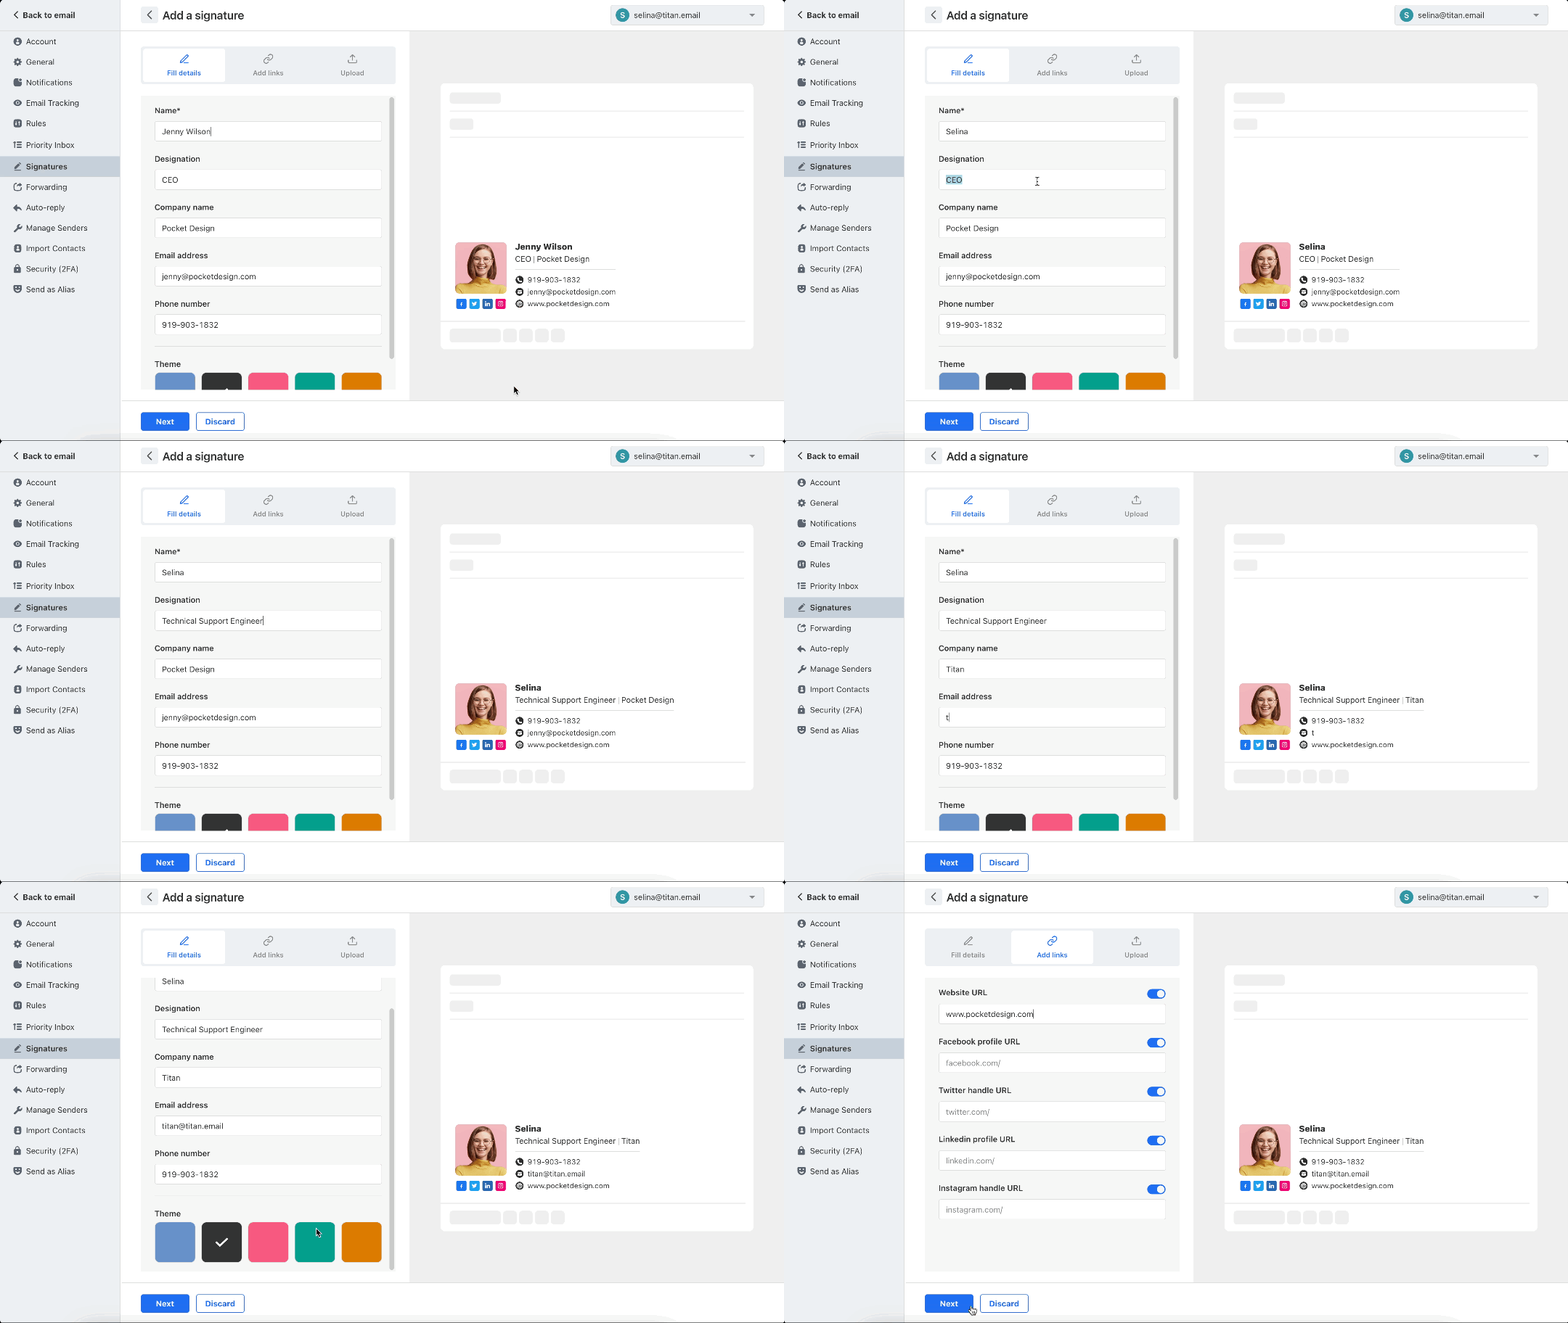
Add links step

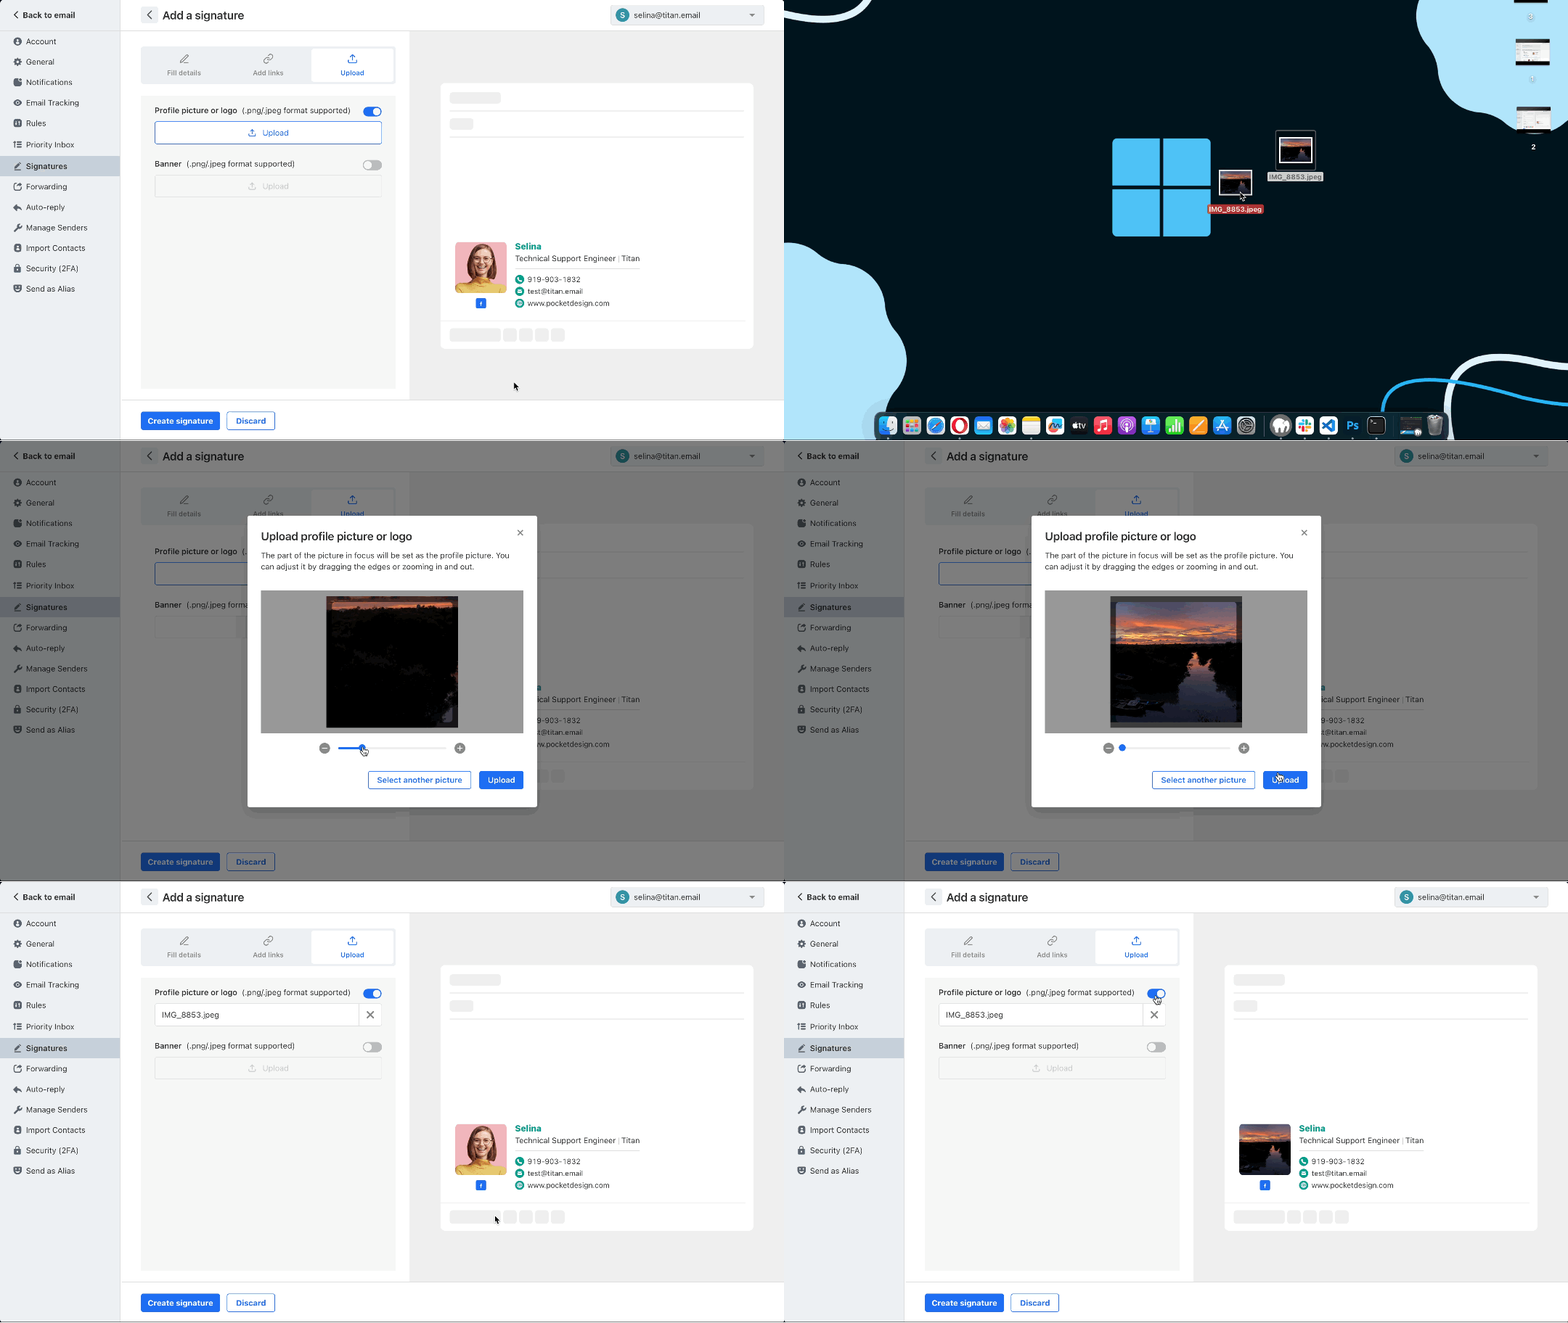
  • Upload a profile picture/logo, or a campaign banner in the Upload tab.
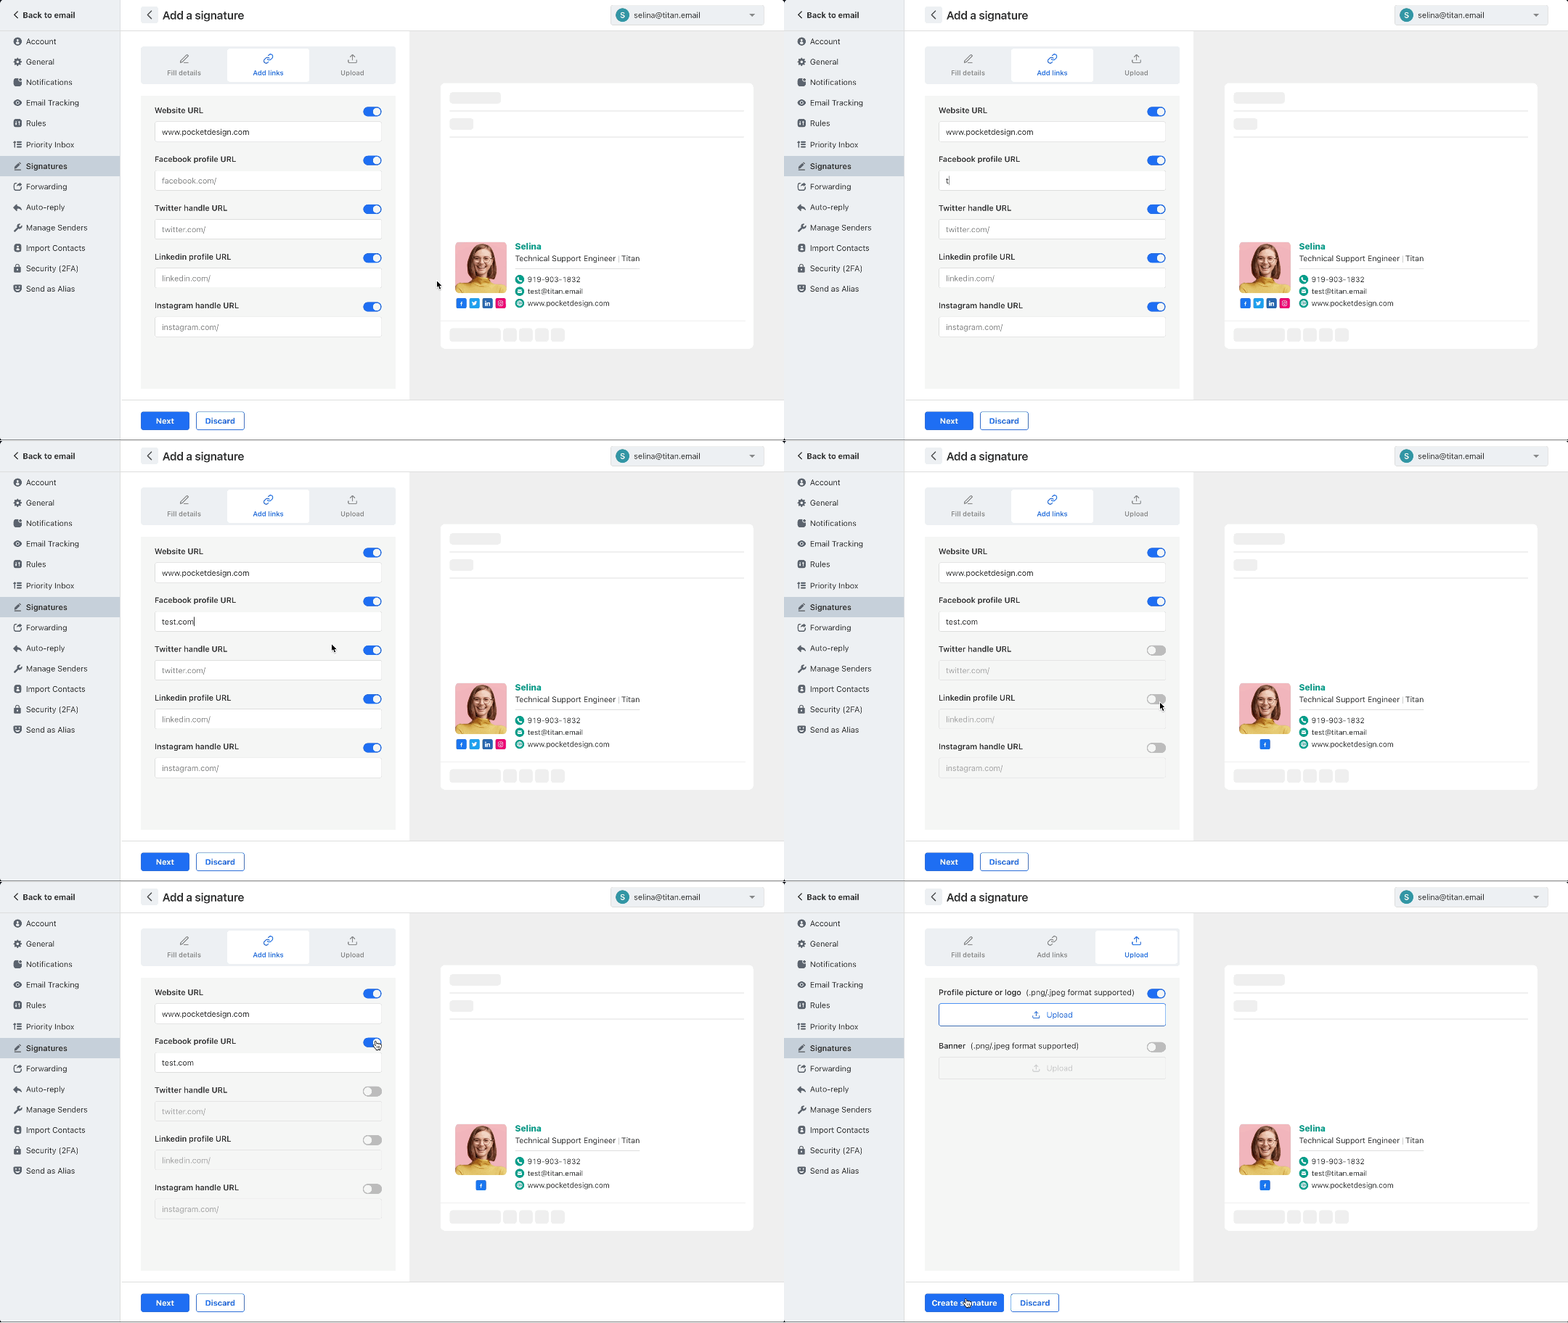
Upload image step

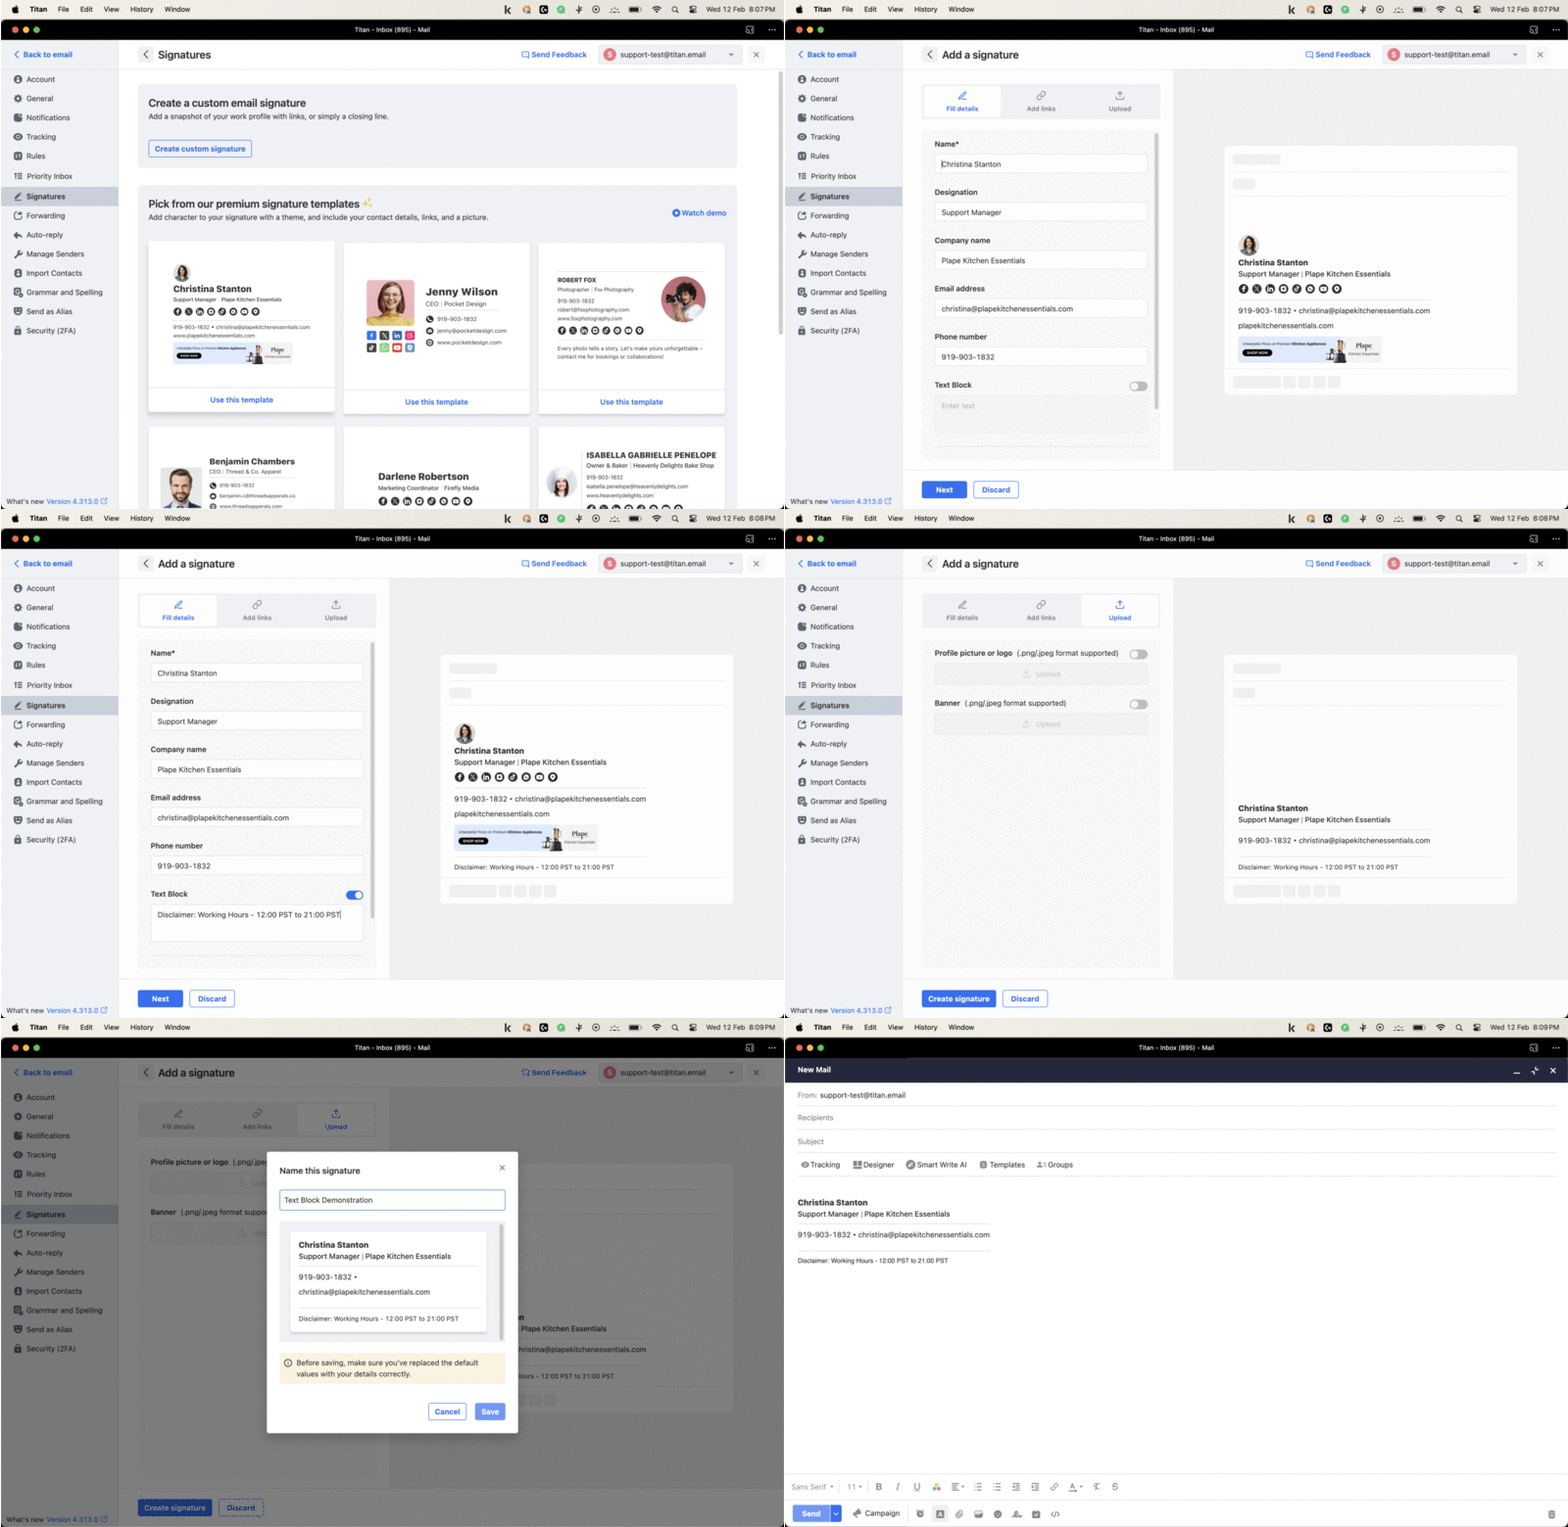
  • You can also add a Text Block for extra content such as disclaimers and additional information.
Text block step

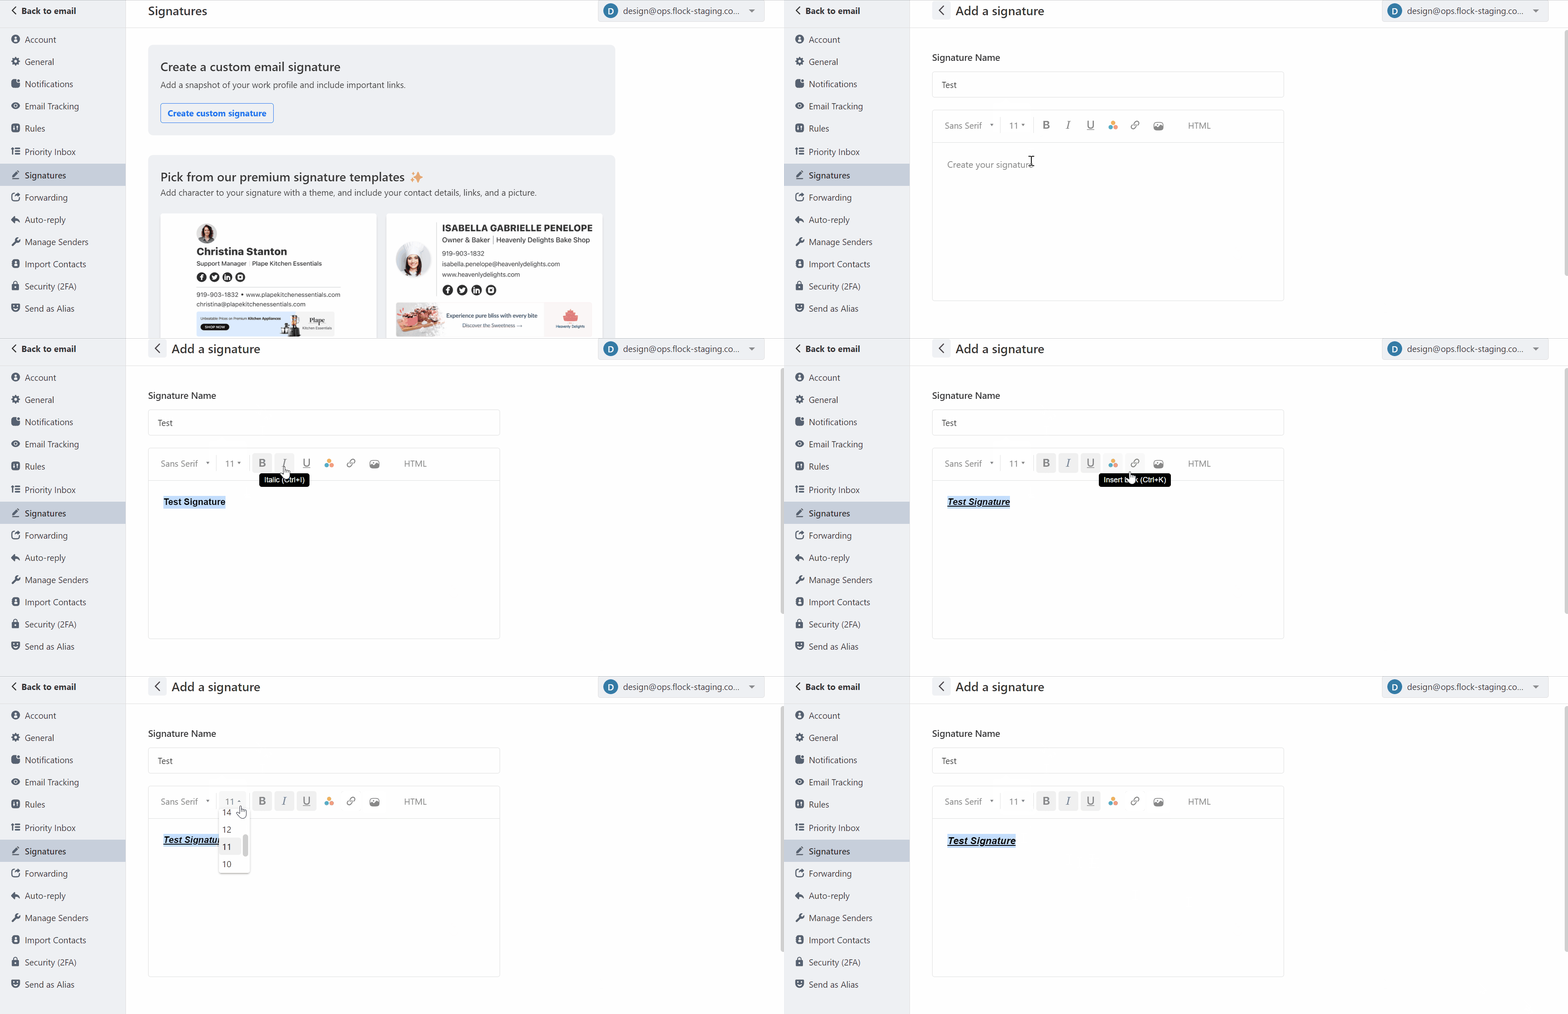
2. Creating a custom email signature #
Text block step

  • Click Settings (gear icon) in the top-right corner of Titan Webmail and select Preferences.
  • Go to Signatures.
  • Add a name to identify the signature.
  • Style your signature using options such as bold, italic, underline, and hyperlinks to your website or social profiles. You can also add your company logo.
  • To use a custom format, you can edit it as raw HTML.
  • Click Save. Your signature is ready.

Managing signatures #

After saving signatures, you can edit them, delete them, or set defaults for different email scenarios.

  • To remove an existing signature, click the trash icon.
  • To add a new signature, click Add Signature (top right).
  • You can set defaults for new emails, replies, and forwards.

Default signatures are automatically added to outgoing email. In the Signatures menu, look for Signature defaults. Use the dropdown to choose which signature to apply for each scenario.
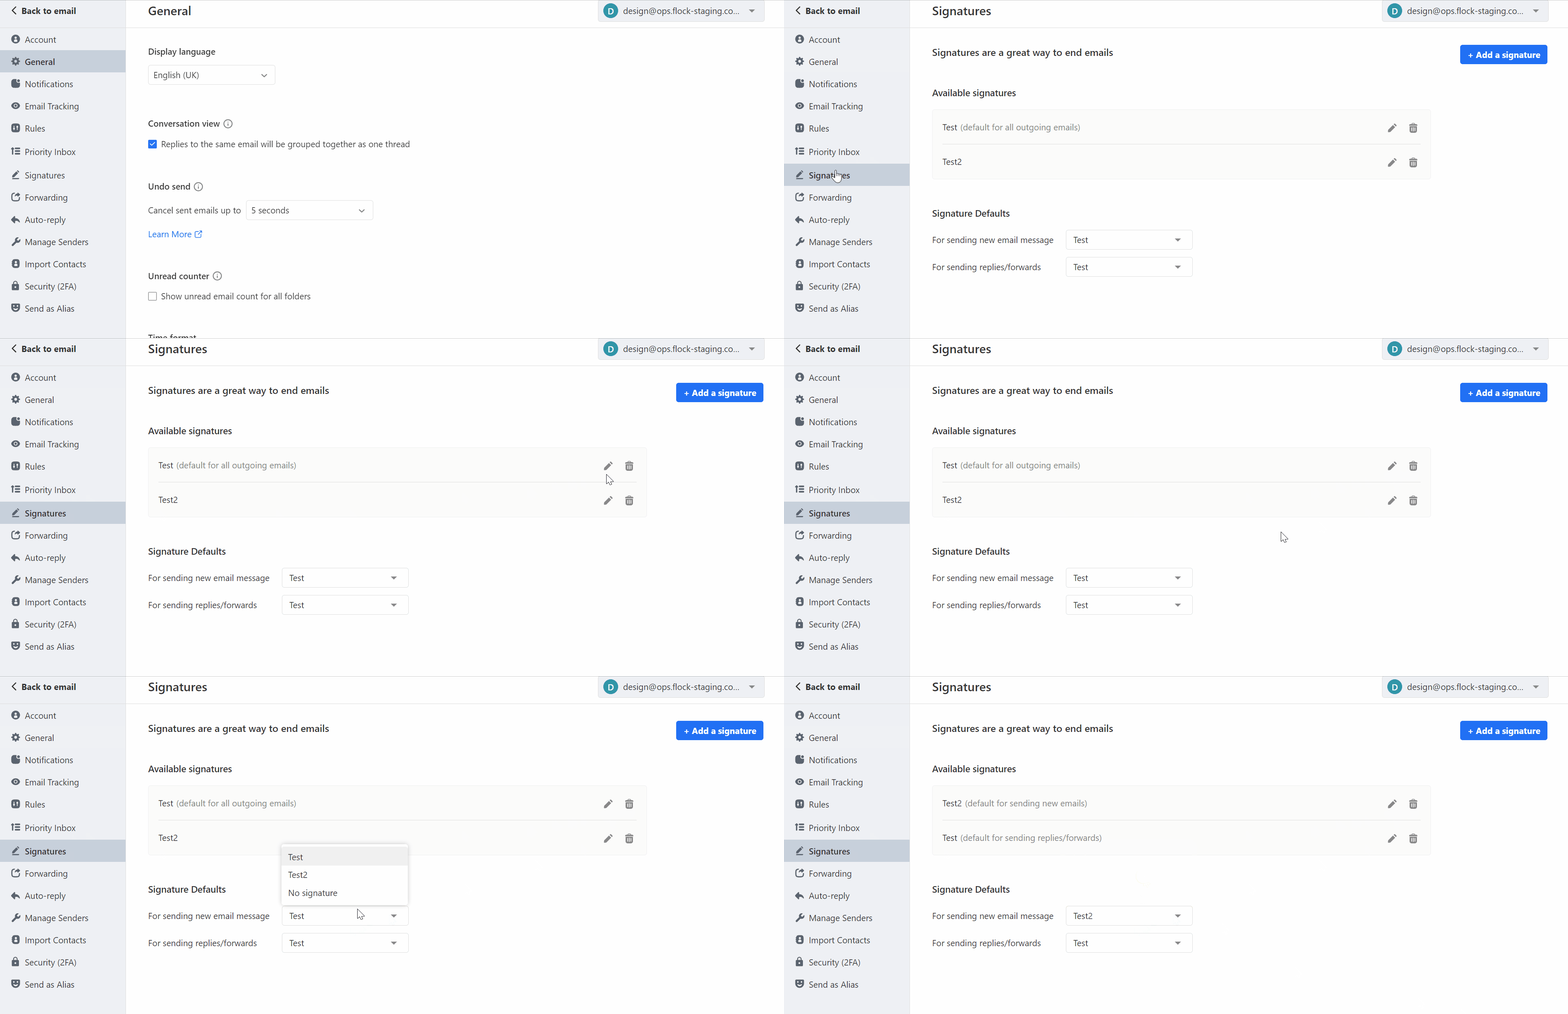
Signature defaults dropdown

Using your signatures in emails #

Once your signatures are set, you can insert any of them while composing an email.

  • While composing an email, click the signature icon in the bottom toolbar (near the emoji icon).
  • Select the signature you want to use. It will be inserted at the bottom of your email.
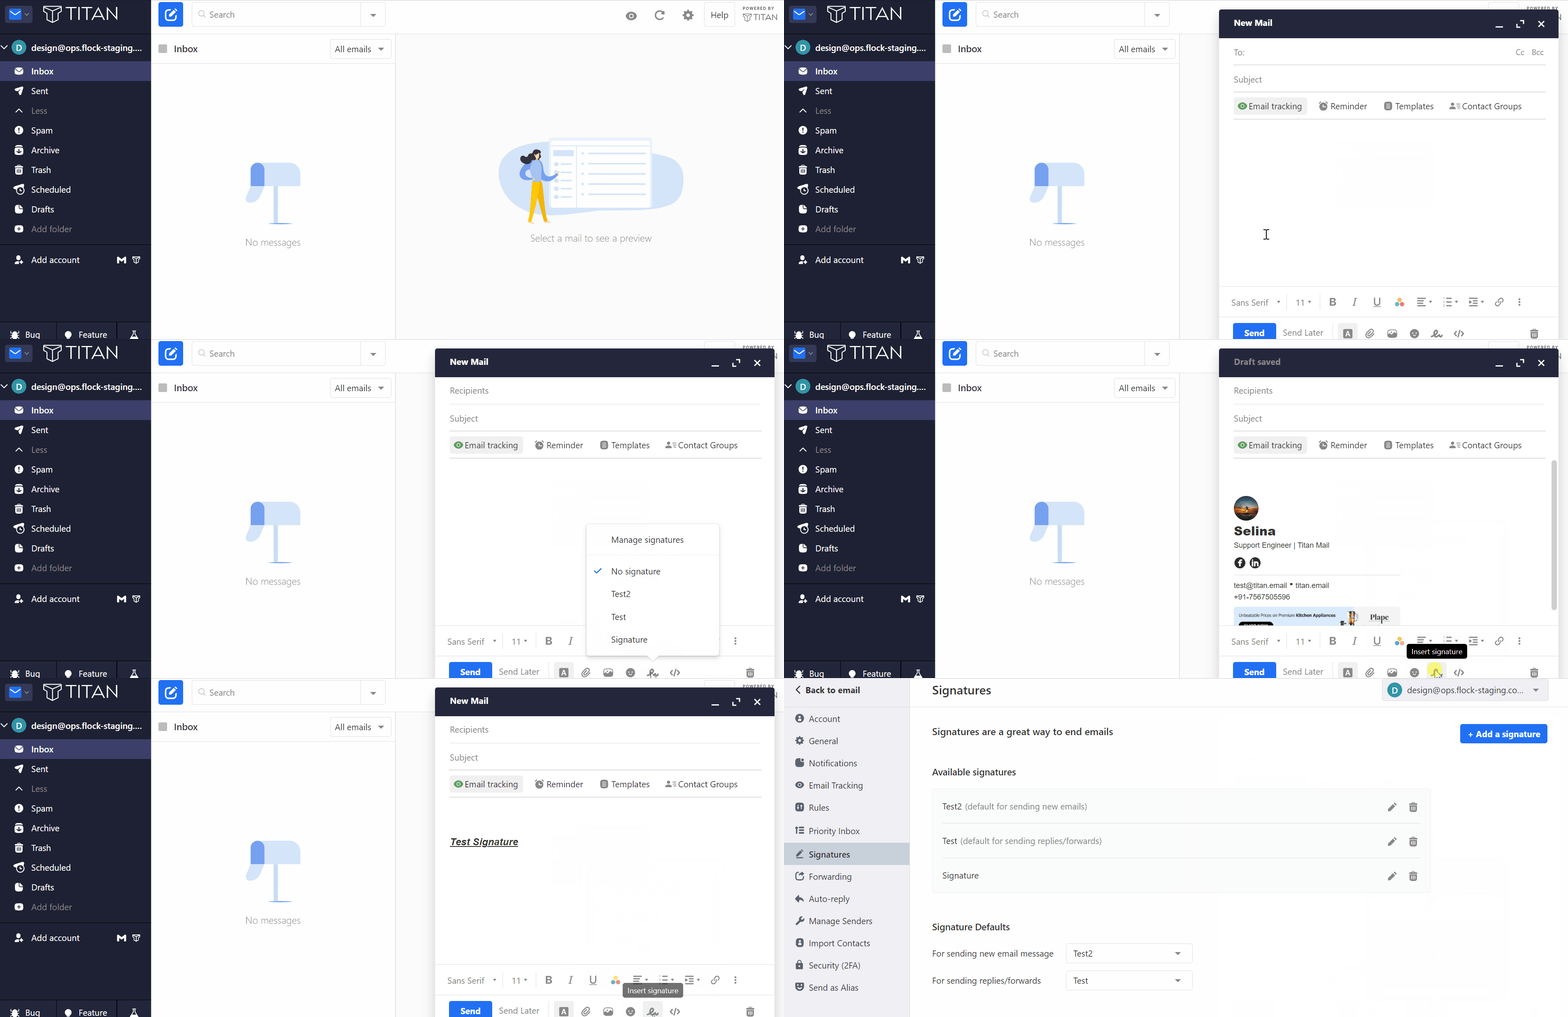
Insert signature while composing

Creating and managing email signatures on mobile #

This feature lets Titan mobile users create, edit, and manage signatures directly from their mobile device. Signatures sync across webmail and mobile so you maintain a consistent professional identity.

Steps to create an email signature on the Titan Mobile App

  1. Open the Titan Mobile App
    Launch the Titan app on your mobile device.
  2. Go to Settings
    Tap the Settings icon (⚙️) from the bottom navigation.
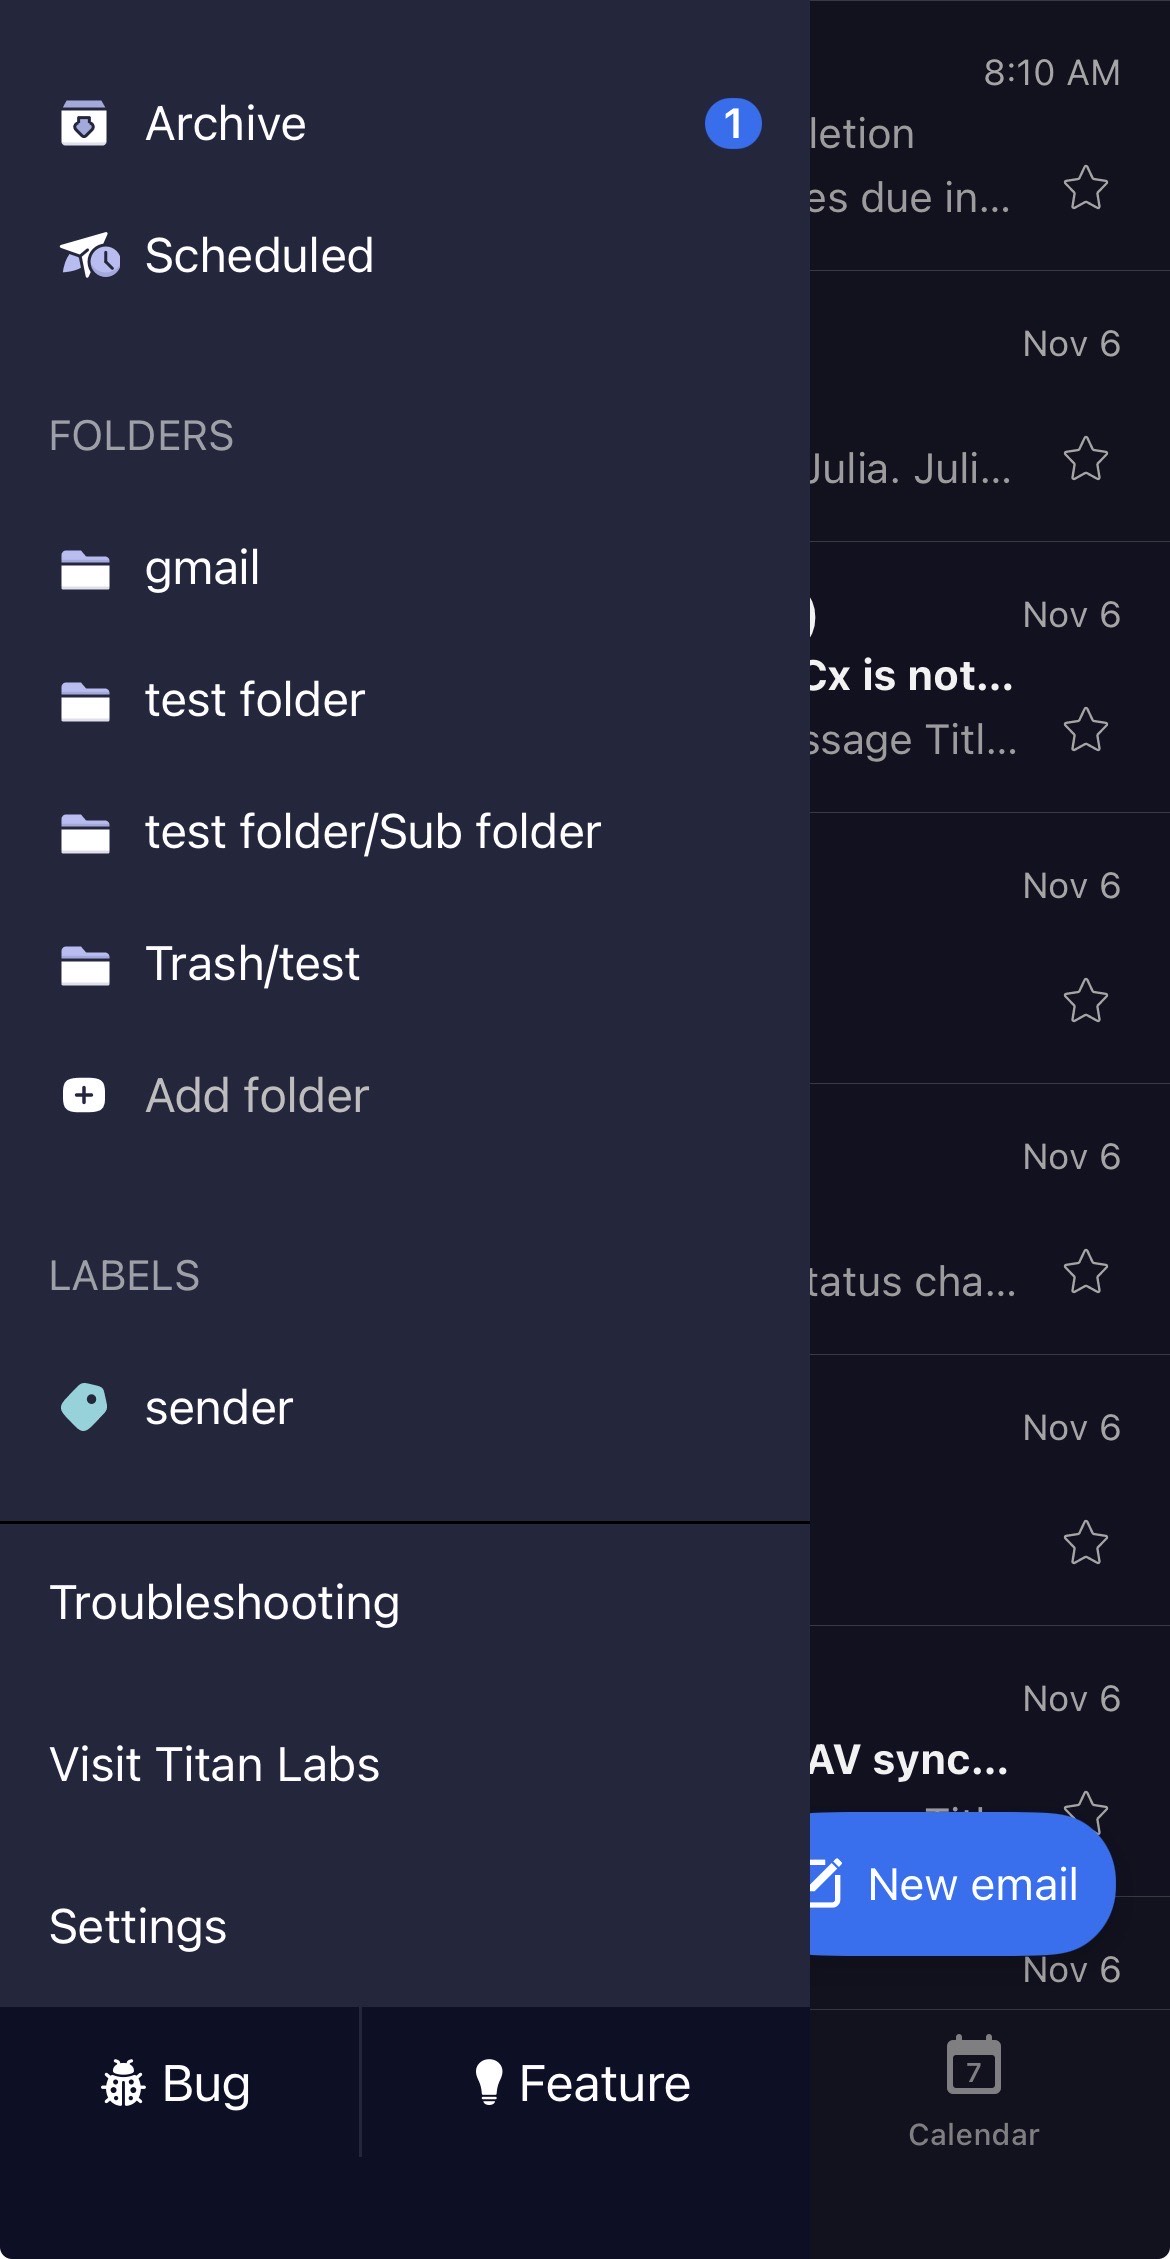
    Titan mobile settings icon
  3. Select “Signatures”
    Under Settings, choose Signatures to view and manage your existing signatures.
  4. Add a new signature
    Tap Add to create a new signature. Enter your text and apply minimal formatting (bold/italics), or copy/paste an existing signature.
  5. Save your signature
    When you’re satisfied, tap Save.
  6. Set as default (optional)
    You can set the signature as the default for outgoing emails (including signatures already created in the webmail interface).
  7. Automatic sync
    Your signature will automatically sync across Titan platforms (webmail and mobile).Signature sync across devices
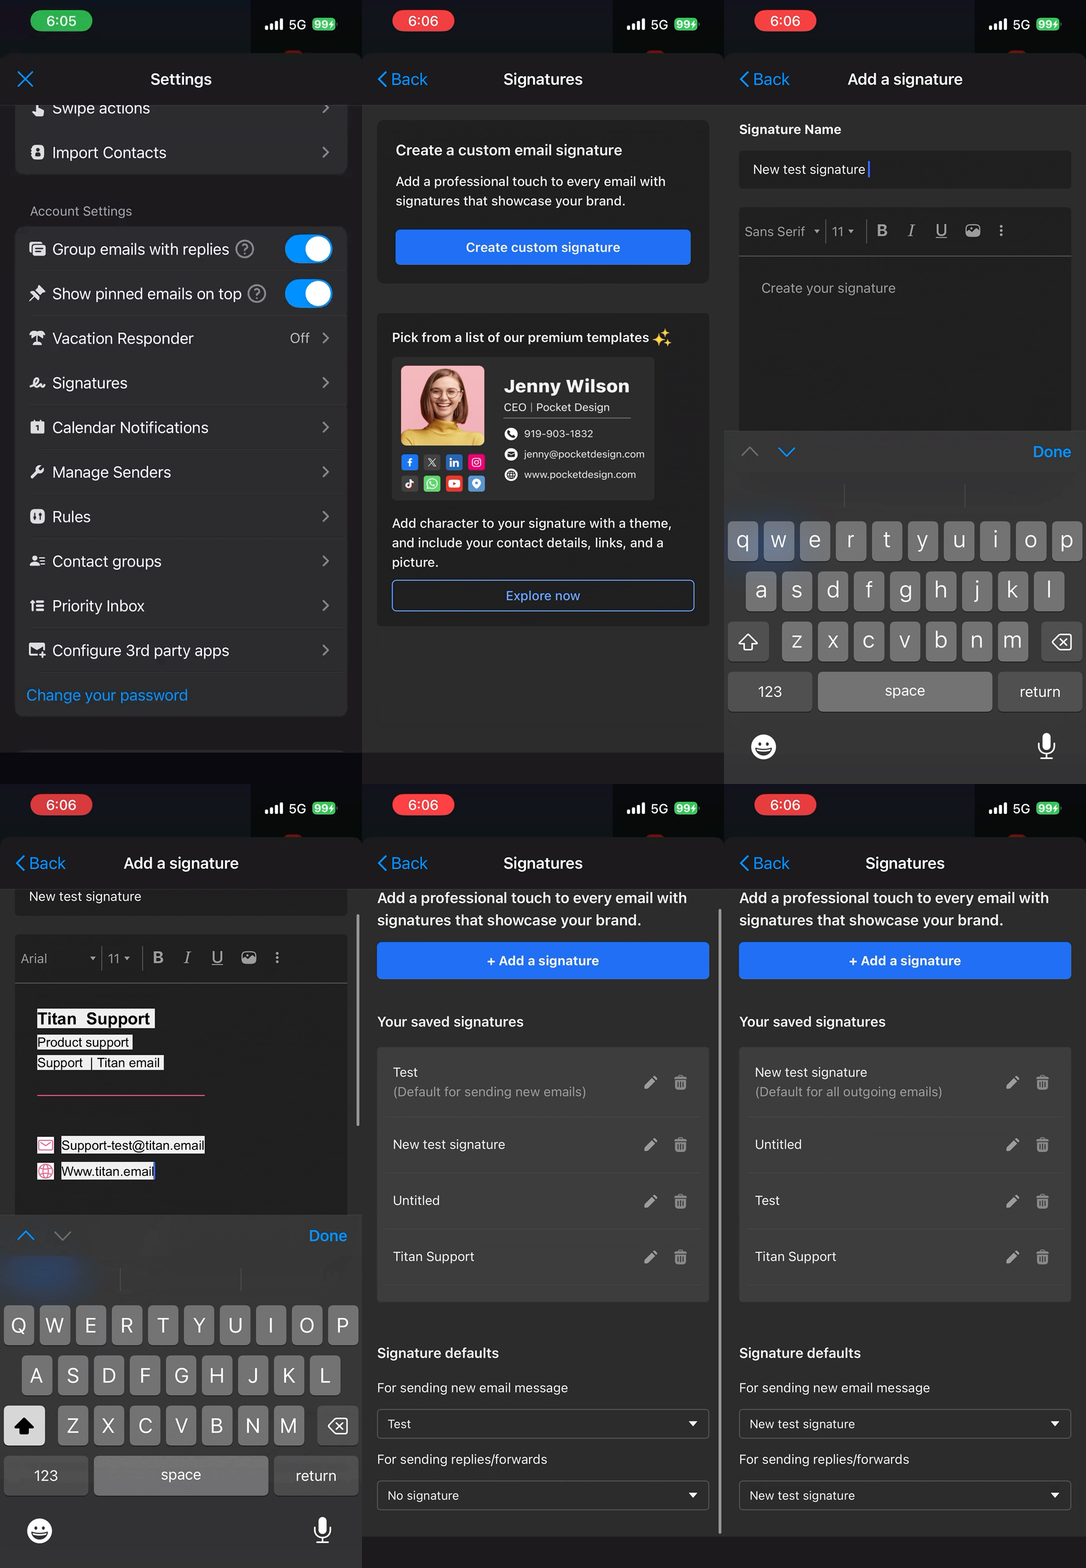
  • For Designer (template) signatures: tapping edit opens a view-only preview with the message: “This signature is created using premium templates. Use Titan webmail to manage it.”
  • Premium templates can only be created/managed in Titan Webmail on a desktop or laptop.
Did you like this article ?

Share This Article :

  • Facebook
  • X
  • LinkedIn
Updated on September 8, 2026
How to setup an Email Alias in TitanConfigure Titan Mail in Microsoft Outlook
Table of Contents
  • Accessing the email signatures section
    • 1. From the App Switcher
    • 2. From the Preferences section
  • Setting up email signatures
    • 1. Using Titan’s professional templates
    • 2. Creating a custom email signature
  • Managing signatures
  • Using your signatures in emails
  • Creating and managing email signatures on mobile
dc-logo

Subscribe to our Newsletter

Services

Web Hosting

Domain Registration

Email Solutions

Domain Transfer

Website Services

Company

About Us

Blog

Contact Us

Legal

Accessibility Statement

customer service



Help Centre



Existing Client Login



Sales Enquiries



System Status

customer service



Help Centre



Existing Client Login



Sales Enquiries



System Status

Services

Web Hosting

Domain Registration

Email Solutions

Domain Transfer

Website Services

Company

About Us

Blog

Contact Us

Legal

Accessibility Statement

© Copyright Domain Central ANZ 2025

Privacy Policy • Terms of Service 

  • Follow
  • Follow
  • Follow
Manage Consent
To provide the best experiences, we use technologies like cookies to store and/or access device information. Consenting to these technologies will allow us to process data such as browsing behaviour or unique IDs on this site. Not consenting or withdrawing consent, may adversely affect certain features and functions.
Functional Always active
The technical storage or access is strictly necessary for the legitimate purpose of enabling the use of a specific service explicitly requested by the subscriber or user, or for the sole purpose of carrying out the transmission of a communication over an electronic communications network.
Preferences
The technical storage or access is necessary for the legitimate purpose of storing preferences that are not requested by the subscriber or user.
Statistics
The technical storage or access that is used exclusively for statistical purposes. The technical storage or access that is used exclusively for anonymous statistical purposes. Without a subpoena, voluntary compliance on the part of your Internet Service Provider, or additional records from a third party, information stored or retrieved for this purpose alone cannot usually be used to identify you.
Marketing
The technical storage or access is required to create user profiles to send advertising, or to track the user on a website or across several websites for similar marketing purposes.
  • Manage options
  • Manage services
  • Manage {vendor_count} vendors
  • Read more about these purposes
View preferences
  • {title}
  • {title}
  • {title}